I have built new web pages for my condominium using Gatsby, but they need a server to run on as well - and I need the static pages to be automatically rebuilt when new content is added. This is how I set everything up.
The most obvious choice for hosting the new web site was for me Netlify. I knew Netlify well from previous projects and also have used it for my personal website lekanger.no. The most important reason, however, was how easy it is to deploy a Gatsby website to Netlify. Another reason why i chose Netlify is that it is free as long as you have relatively modest traffic. We are a small condominium where everyone pays around 70 euros a month in common expenses, and if we want to keep the expenses low for our residents, we should avoid high operating costs for the web site.
Gatsby Cloud or Netlify?
Lately, Gatsby has increasingly been pushing hard on its own hosting solution, Gatsby Cloud. Every time Gatsby launches something new, they focus almost exclusively on Gatsby Cloud. Support for new functionality is often available first on Gatsby Cloud.
There is no doubt that Gatsby works hard to make the developer experience on Gatsby Cloud superior to everything else. You often have to use special plugins or make an extra effort to find out how to do things with Netlify. With Gatsby Cloud it just works. For example, Gatsby recently launched built-in support for serverless functions, which makes it easy to build backend APIs for your website. When this was launched, it was difficult to find information anywhere about how you could get Gatsby Functions working on something else than Gatsby Cloud. However, this is possible - and Netlify has posted a user guide here describing how you set it up by installing a separate plugin. Now Netlify has even added auto-install for this plugin, so you don't have to do anything to get Gatsby Functions working on Netlify. I should mention that Netlify have had support for serverless functions for a long time (Netlify Functions, but with built-in support in Gatsby, everything has become a little more streamlined for those of us building Gatsby sites.
I think it's important to have a performant web site. Like Netlify, Gatsby Cloud now also has its own CDN solution operated by Fastly, which means that the websites are delivered to users in a flash almost no matter where in the world they may be.
For now, I'm running Netlify, but you should be aware of the options when you're making your choice. If I were to start the project again today, perhaps Gatsby Cloud would be the most obvious choice for me.
Setting up continous deployment
There are two ways to deploy a website to Netlify: 1) Let Netlify know where the git repo of the website is located, or 2) Run gatsby build locally to create a production build of the website and then drag-and-drop the public folder from your project over to Netlify (see below).
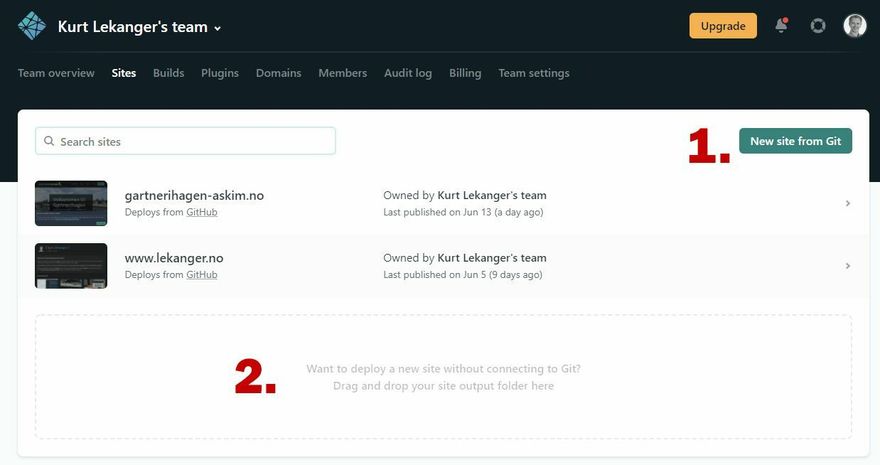
I wanted continuous deployment, so I chose to give Netlify access to the git repo on Github by pressing the large, green "New site from Git" button (there is also support for Gitlab and Bitbucket). With continuous deployment, Netlify will "listen" to changes in the git repo and automatically rebuild the page if anything has changed.
By default, Netlify will use the master (main) branch, but you can also use another branch. This can be useful if you want to create a "staging" area for testing. Then you can have a git branch called, for example, staging or development, and have Netlify building those as separate websites that you can use to test things out before you deploy to production. Creating staging sites and the like can be automated through what Netlify calls deploy contexts. This is not something I have set up yet for the condominium's website - but take a look at the documentation if you want to learn more about it.
You probably do not need to change the default settings, but if you want you can define which command to run to build the page (default is npm run build).

When this is done, you have to set up all the environment variables you're using in your code. That is, all of the API keys and various secrets that you normally keep in an .env file (which you MUST remember to put in your .gitignore file , so that unauthorized persons do not get hold of it).
For the condominium's websites, there were environmental variables for two services/APIs I had to define:
-
Contentful: 1) A
space idto the site I had created on Contentful with all the content. 2) Anaccess tokenfor Gatsby to be able to authenticate itself to Contentful and be able to download the content. You can find these by logging in to your site on Contentful, going to the Settings menu and then selecting API Keys. - Auth0: Here I needed two things: 1) Auth0 domain, 2) Client ID.
Those were the variables I had to set up when I started the project, but later on I have also added a user admin dashboard and other things, so my list of environment variables has gotten quite long:
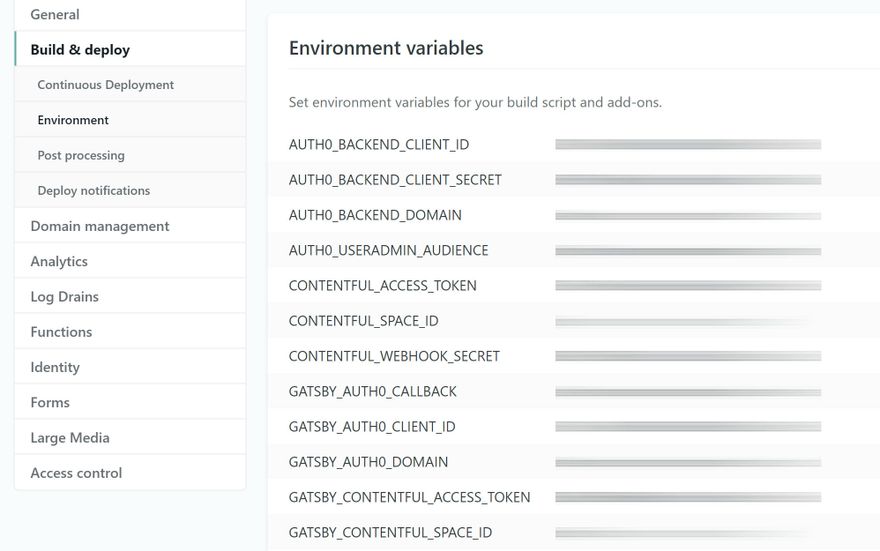
You cand find all of them in an example file in the Github repo for this project.
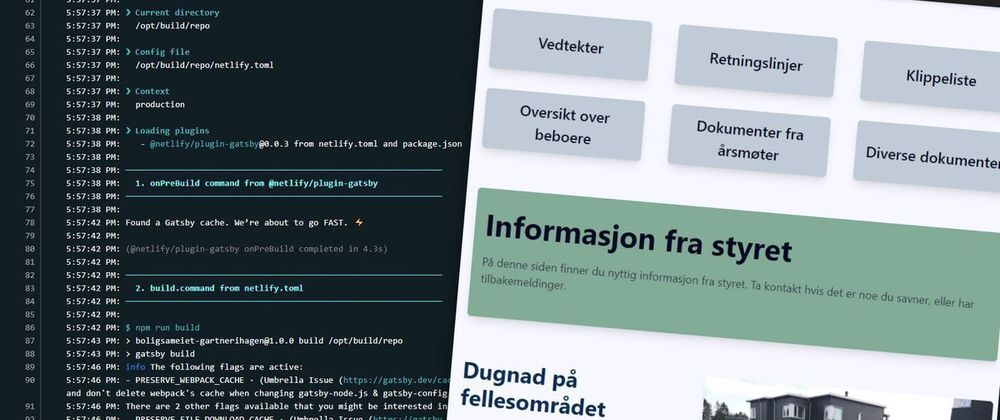
As soon as I pointed Netlify to the correct git repo and copied over the environment variables from my local .env file, the website was built automatically by Netlify. The web pages are cached on Netlify's CDNs, so they are blazingly fast no matter where you are in the world.
By default, you get a slightly cryptic URL - but I made sure quite quickly to register a proper domain for the condominium.
You can read more about deploying to Netlify here.
Trigger builds when new content is published
Since the new Gatsby site for our condominium is a static website based on content fetched from a "headless CMS" (Contentful) when the pages are built, I needed a way to automatically rebuild the site when someone published new content.
This is quite easy to solve:
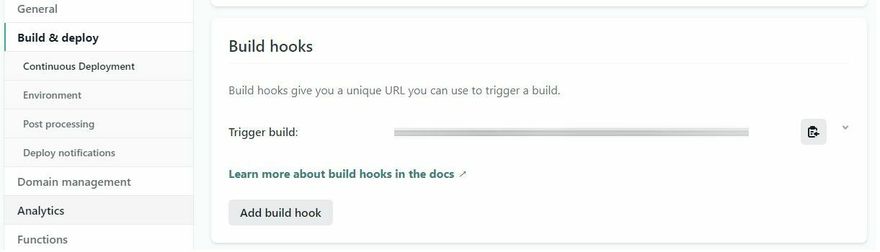
- Go to Site settings in Netlify and select
Build & deploy - Scroll down to
Build hooksand pressAdd build hook - Give the hook a name (I called it "Trigger build") and choose which branch of the git repo you want to build.
- In Contentful, go to Settings and Webhooks. Select Add webhook and use the URL of the hook you created on Netlify. You should do a POST request to this hook, and select that it should trigger only when new content is published.
When you add new content, the web site has to be rebuilt before the content shows up on the live site. This can take a few minutes, but has gotten a lot quicker lately thanks to a lot of improvements in Gatsby.
If you want previews of unpublished content, you have to use Contentfuls preview API to fetch unpublished content. You could build a preview page in Gatsby for this. However, I haven't done this yet for our web site - I just edit the content in Contentful and wait for the deploy to finish.
Next step: Making a user admin dashboard with Gatsby Functions and Auth0
Feel free to take a look at the finished website here: https://gartnerihagen-askim.no
The project is open source, you can find the source code at my Github.
This is a translation, the original article in Norwegian is here: Del 4: Slik bygget jeg sameiets nye nettsider. Kontinuerlig utrulling til Netlify


Latest comments (0)