cross-post from my Blog
So, you've got a site set up with Django and you've got everything running. One small problem: There's no way for users to contact you. Having this functionality is essential because sometimes users may have some questions about your site and/or any services you're offering.
Django doesn't come with built-in contact forms, however creating your own contact form is relatively easy. Let's see how.
I'm not going to go too in-depth into creating a new Django project, since this article assumes you've already got a site up and running. However, I will quickly run through the steps again for the beginners.
Set up a Python Virtual Environment
This allows us to install Django and other dependencies within a closed environment, just for this project. That way, we avoid cluttering our system install of Python.
Once you're in the directory you're building your project in, run the following terminal command:
python -m venv contact_env
The above command will create a virtual environment called contact_env in the current directory. You can replace contact_env with a name of your choice.
Once your virtual environment has been created, activate it with the following command if you're using Windows:
contact_env/Scripts/activate
Or if you're using Linux/macOS:
source contact_env/bin/activate
You will see (contact_env) right at the beginning of your terminal line. This means that the virtual environment is activated and any packages that you install will be installed only for this environment.
Install Django
Ensure that you're in the correct virtual environment and run the following command:
pip install django
This will install the latest version of Django as well as any other dependencies that it requires. Your terminal output will look something like this:
Collecting django
  Downloading Django-3.1.6-py3-none-any.whl (7.8 MB)
     |████████████████████████████████| 7.8 MB 2.2 MB/s
Collecting sqlparse>=0.2.2
  Using cached sqlparse-0.4.1-py3-none-any.whl (42 kB)
Collecting pytz
  Downloading pytz-2021.1-py2.py3-none-any.whl (510 kB)
     |████████████████████████████████| 510 kB 6.4 MB/s
Collecting asgiref<4,>=3.2.10
  Using cached asgiref-3.3.1-py3-none-any.whl (19 kB)
Installing collected packages: sqlparse, pytz, asgiref, django
Successfully installed asgiref-3.3.1 django-3.1.6 pytz-2021.1 sqlparse-0.4.1
Once Django has been installed successfully, we can create our project.
Setting up a Django project and app
Navigate to the directory where you'd like the project to be and type the following command:
django-admin startproject contact_project
This will start a Django project with the name contact_project. With the project created, we are now ready to create an app inside of the project. Navigate to the contact_project directory and make sure you're in the same directory as the manage.py file. Run the following command:
python manage.py startapp contact
Alright, we're ready to open the contact_project directory in a text editor. I use VS Code, you can use whichever editor you prefer.
Inside of your contact_project directory, there will be another directory called contact_project which will have files like settings.py and urls.py. Let's open settings.py. Once you scroll a little, you'll see the INSTALLED_APPS list:
INSTALLED_APPS = [
    'django.contrib.admin',
    'django.contrib.auth',
    'django.contrib.contenttypes',
    'django.contrib.sessions',
    'django.contrib.messages',
    'django.contrib.staticfiles',
]
We're going to add our newly created contact app to the above list. Add it to the top of your list like so:
INSTALLED_APPS = [
    'contact',
    'django.contrib.admin',
    'django.contrib.auth',
    'django.contrib.contenttypes',
    'django.contrib.sessions',
    'django.contrib.messages',
    'django.contrib.staticfiles',
]
Save the settings.py file. Open up your terminal in the same directory as manage.py and run the following commands:
python manage.py makemigrations
python manage.py migrate
Now the database has been initialized and our project should be up and running. Run the command:
python manage.py runserver
And you'll see an output that looks like this:
Watching for file changes with StatReloader
Performing system checks...

System check identified no issues (0 silenced).
February 10, 2021 - 14:59:56
Django version 3.1.6, using settings 'contact_project.settings'
Starting development server at http://127.0.0.1:8000/
Quit the server with CTRL-BREAK.
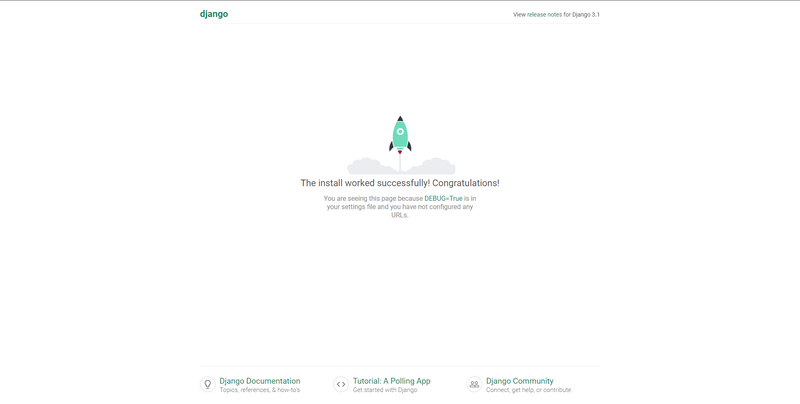
This means that the development server is running. If you visit the address http://127.0.0.1:8000/ in your browser, you should see the following page:
Great! We've verified that our project is set up correctly. There's one more thing we need to do before we can move on to the next section, and that's to create an admin user.
In your terminal window, close the development server by pressing Ctrl+C. You might have to press it a couple of times for the server to close. With the server closed, run the following command:
python manage.py createsuperuser
The system will then ask you to enter a username. I entered admin. It'll then ask for an email address, and will ask you to enter a password. If you chose a password that's too short or too common, the system will show an error like this:
The password is too similar to the username.
This password is too short. It must contain at least 8 characters.
This password is too common.
Bypass password validation and create user anyway? [y/N]:
Enter y and press enter. You'll then see the output:
Superuser created successfully.
Awesome. Run the command python manage.py runserver again and the server should start up like before, and the webpage should remain unchanged. We can now move on to the next section.
Setting up a contact page template
Now that we've got the set up bit out of the way, it's time to render some actual HTML instead of the default Django page. In the contact_project directory, you'll see a directory called contact. This is the app we created earlier.
In the contact directory, create a directory called templates and a directory called contact inside of templates. Your file structure should look like this:
contact
|__ templates
    |__ contact
We're going to create a file called base.html inside of the templates/contact folder. Then we're going to add the following HTML:
<!DOCTYPE html>
<html>
    <head>
        <title>Django contact app</title>
    </head>

    <body>
        {% block content %}
        {% endblock content %}
    </body>
</html>
The {% block content %} and {% endblock content %} are functions of Django's templating engine. They allow us to insert content into a specific block, allowing us to build off of the base template without having to enter the entire HTML again and again.
Next, we're going to create a new file called contact.html in the same directory as base.html. Add the following HTML:
{% extends 'contact/base.html' %}

{% block content %}
    <h1>This is a contact page.</h1>
{% endblock content %}
The {% extends ... %} tag tells Django that this template is building off of contact/base.html, and adding {% block content %} here allows us to insert elements into the block we defined in base.html.
Now, open views.py in the contact app. You'll see a file that looks like this:
from django.shortcuts import render

# Create your views here.
We're now going to create a new view that redirects us to our contact.html page. Add the following code below the # Create your views here. comment:
def contact(request):
    return render(request, 'contact/contact.html')
This is a very basic view but we'll expand on this later. Save the views.py file and in the same directory, create a file called urls.py. Add the following code:
from django.urls import path

from .views import contact

urlpatterns = [
    path('', contact, name='contact'),
]
This tells Django that any traffic coming to the homepage of the site must be redirected to the contact view we created, which renders the contact.html template. Now one last thing before we can check it:
Go to the urls.py file in the contact_project/contact_project directory. You'll see a line that says:
from django.urls import path
Edit the line so it says:
from django.urls import include, path
Edit the urlpatterns list to look like this:
urlpatterns = [
    path('admin/', admin.site.urls),
    path('', include('contact.urls')),
]
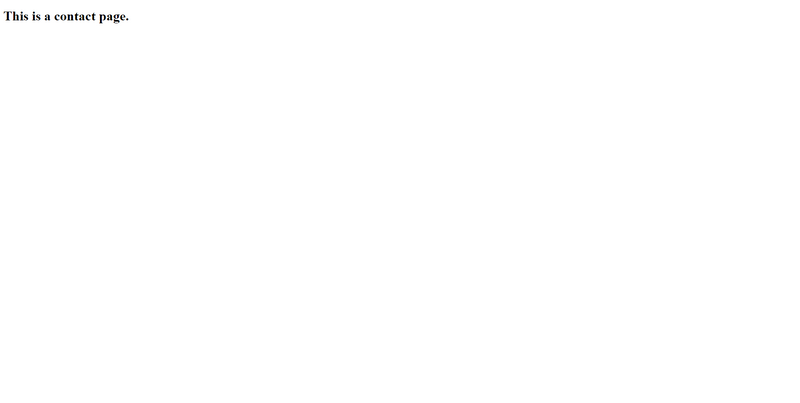
If you save the file, the server will reload. Open your browser and http://127.0.0.1:8000/ should look like this:
Look, it's the contact page we created! Congratulations if you've made it this far.
Forms, forms, forms.
What we've done so far is basic Django set-up. Now we get to the main section that you've been looking for: creating and setting up a contact form.
Django comes with a built-in forms API that allows us to quickly and easily set up custom forms, without having to worry about the back-end too much. Let's get started. The first thing that we're going to do is a little modification in the settings.py file that configures Django to send emails.
Since this is a tutorial environment, we're going to configure Django to store emails as files on our hard drive. Open settings.py and add the following code to the end of the file:
EMAIL_BACKEND = 'django.core.mail.backends.filebased.EmailBackend'
EMAIL_FILE_PATH = BASE_DIR / 'emails'
This tells Django to store emails in the emails directory as if it were sending an email. We'll see this in action later.
Now, in the contact app directory, create a new file called forms.py and add the following code:
from django import forms

class ContactForm(forms.Form):
    from_email = forms.EmailField(required=True)
    subject = forms.CharField(required=True)
    message = forms.CharField(widget=forms.Textarea, required=True)
This will create a basic form with three fields: from_email, subject, and message. Now we need to modify the views.py file in the same directory. First add the following imports to the top of the file:
from django.shortcuts import render, redirect
from django.core.mail import send_mail, BadHeaderError
from django.http import HttpResponse, HttpResponseRedirect

from .forms import ContactForm
This imports some Django functions regarding e-mails as well as the ContactForm we just created. Now let's modify the contact view to look like this:
def contact(request):

    if request.method == 'POST':
        form = ContactForm(request.POST)

        if form.is_valid():
            from_email = form.cleaned_data['from_email']
            subject = form.cleaned_data['subject']
            message = form.cleaned_data['message']

            try:
                send_mail(subject, message, from_email, ['test@user.com'])
            except BadHeaderError:
                return HttpResponse('Invalid header found.')

            return redirect('contact_success')

    else:
        form = ContactForm()

    return render(request, 'contact/contact.html', {'form': form})
The updated view now checks if the request is a GET or a POST request. If the request is a POST request, it means that the form was submitted, and so we need to clean the data from the form, and send an email. The send_mail function takes the arguments that we defined and sends an email to whichever address we add in place of test@user.com. Since we are only rendering our emails to a file for now, it doesn't matter what email address we insert in that argument.
Now we need to create another view below the contact view called contact_success. Here's what it will look like:
def contact_success(request):
    return render(request, 'contact/contact_success.html')
For reference, this is what my views.py file looks like now.
from django.shortcuts import render, redirect
from django.core.mail import send_mail, BadHeaderError
from django.http import HttpResponse, HttpResponseRedirect

from .forms import ContactForm

# Create your views here.
def contact(request):

    if request.method == 'POST':
        form = ContactForm(request.POST)

        if form.is_valid():
            from_email = form.cleaned_data['from_email']
            subject = form.cleaned_data['subject']
            message = form.cleaned_data['message']

            try:
                send_mail(subject, message, from_email, ['test@user.com'])
            except BadHeaderError:
                return HttpResponse('Invalid header found.')

            return redirect('contact_success')

    else:
        form = ContactForm()

    return render(request, 'contact/contact.html', {'form': form})


def contact_success(request):
    return render(request, 'contact/contact_success.html')
Now, we need to edit the urls.py file inside the contact app before we are ready to render the form on the front-end template. First add contact_success to the import at the top of the file:
from .views import contact, contact_success
Then add a new path to the urlpatterns list:
path('success/', contact_success, name='contact_success'),
For reference, this is what my contact/urls.py file looks like now:
from django.urls import path

from .views import contact, contact_success

urlpatterns = [
    path('', contact, name='contact'),
    path('success/', contact_success, name='contact_success'),
]
Perfect. Now we're ready to update our contact.html template. We're going to modify the file to look like this:
{% extends 'contact/base.html' %}

{% block content %}
    <h1>This is a contact page.</h1>

    <form action="." method="POST">

        {% csrf_token %}

        {{ form.as_p }}

        <div class="form-actions">
            <button type="submit">Send</button>
        </div>

    </form>

{% endblock content %}
The csrf_token provides the security token for Django. form.as_p renders the form as an HTML element, and the button submits the form. There's one last thing we need to do before we can test this out, and that's to create a contact_success.html file in the same directory as our other templates. The file should look like this:
{% extends 'contact/base.html' %}

{% block content %}
    <h2>Your message has been sent successfully. Thank you!</h2>
{% endblock content %}
Congratulations if you've made it this far!
Testing
Now that we've successfully implemented a form, refresh the http://127.0.0.1/8000 webpage. You should see a very basic contact form!
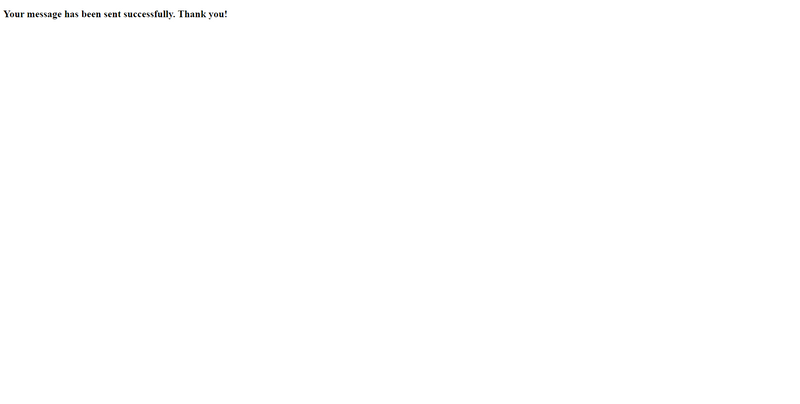
And now, let's just fill in some basic information and submit it. You should see the following page:
Congratulations! You've successfully built a working contact form. Inside of the contact_project directory, you'll see a new directory called emails. Open that and you'll see a .log file. This is, in essence, the email that was "sent":

Content-Type: text/plain; charset="utf-8"
MIME-Version: 1.0
Content-Transfer-Encoding: 7bit
Subject: Test
From: test123@ahmadmuhammad.co.za
To: test@user.com
Date: Thu, 11 Feb 2021 09:51:32 -0000
Message-ID: <161303709234.7052.17125528988305330150@Ahmad-Desktop.Dlink>

This is a test email.
-------------------------------------------------------------------------------
As you can see, it populates the subject, message, and from fields with whatever information you fill in the form. Feel free to mess around and experiment with this!
Conclusion
Now that you know the basics of how to build a contact form, you can expand on it and build up on it. For example, the current form looks really basic and not the most aesthetically pleasing. Feel free to expand on it with some CSS! Feel free to integrate SMTP functionality so that the contact form actually sends the message. The possibilities are endless, and it's up to you how you integrate it into your project.


Oldest comments (2)
👍
Great poppy playtime chapter 3