
The leaves are changing, the weather is getting colder, and the pumpkin spice everything is rolling out. You know what this means.
Hacktoberfest is here! 🎃
As a newcomer to open source, I felt unsure about:
- Whether I can find an open source project to contribute to, and
- If I had the skills to contribute to open source

Fortunately, there are beginner-friendly repos out there you can use to get comfortable with Github and Git.
One beginner-friendly repo I've come across on Github is DigitalOcean's Cloud Haiku Repo. You can also view their README for the repo here
In this 7-step tutorial, I'll show you how to make and contribute your haiku to the DigitalOcean Cloud Haiku repo to get your first Hacktoberfest PR!
For this tutorial we will be using Visual Studio Code and the Windows Powershell terminal inside VS Code. I will assume you have VS Code and Git installed as well as a registered Github account. If not, I've included some additional resources at the bottom of this tutorial.
1. Fork the repo of the project you're interested in contributing to
Forking a repo means to make a copy of the repository. This copy will be a repository that's under your Github account. Doing this allows us to experiment and change the project without changing the original project.
Since we're using DigitalOcean's Cloud Haiku for this tutorial, we will be navigating to their repo here. Click the Fork button which is located on the top-right corner of the page below your profile photo.

After a few moments, you will have the forked repo under your account. The top-left corner of the page will look something like this:

Awesome, if you got something similar to this last image, you are ready to do Step 2!
2. Clone your forked repo to your local machine
Open up Visual Studio and on the top navigation bar, locate and click on Terminal. This will open up a drop-down menu. Now click New Terminal. This will open up a new Windows Powershell terminal at the bottom of the VS Code window.
In this terminal, navigate to the folder where you want to put the repo in. This website lists commands you can use to navigate and change directories in Windows 10
Once you are in your folder. Go back to your forked repo on Github and press the green Code button, which will bring up the following dropdown menu:
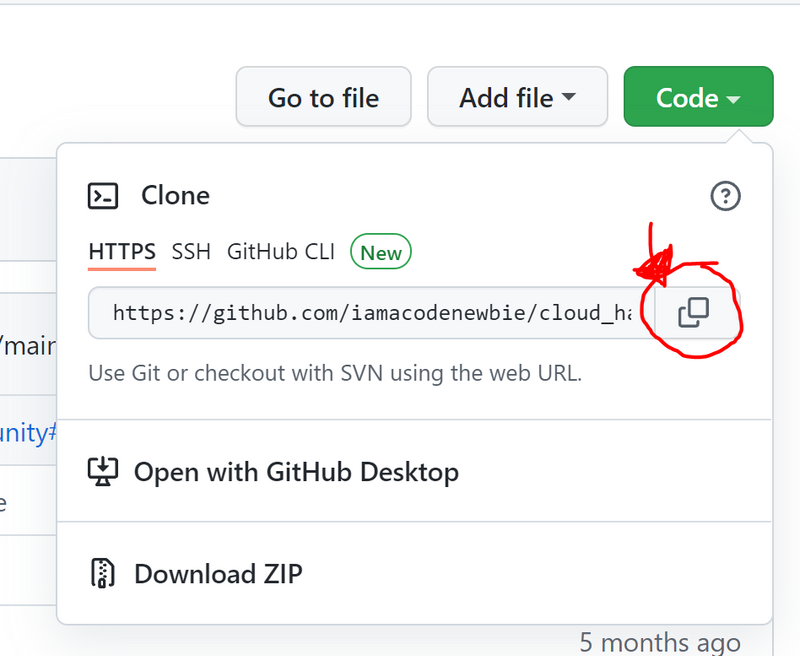
Copy the url in the menu (circled in red in the above picture). Back in the terminal in VS Code, enter the following command:
git clone insert-url-here
Here, you will need replace the 'insert-url-here' text with the url you just copied. Press enter after doing this and you'll now have a copy of the repo on your computer to work with.
3. Create a new branch
Now that we've cloned our repo, we're almost ready to get to work. Right now, we're currently in the main branch of our project. It is good practice to work in a new branch when you're working on a new feature. Working on a new branch ensures we're not making changes to the main branch.
So let's create a new branch shall we? 🌳
In the terminal, we will create a new branch using this command:
git checkout -b enter-branch-name
For our purposes we do not need to name a branch name a certain way, although it helps to be descriptive. You can use a branch name convention similar to 'iamacodenewbie/my_cloud_haiku', where you can replace iamacodenewbie with your Github username. Now that the command now looks something like this press enter:
git checkout -b iamacodenewbie/my_cloud_haiku
After doing this terminal will give you a message that looks like this:
Switched to a new branch 'iamacodenewbie/my_cloud_haiku'
You can also check what branch you are currently in using this command:
git branch
Note: Maintainers might have specific instructions on branch naming, code conventions they want you to use. So be sure to read through the repo's README.md (and CONTRIBUTING.md if they have one)
4. Work on your changes
Okay NOW we're ready to get to work. Since the goal of this repo is for users to add their haikus to the repo we will be adding a new file into our cloned repo.
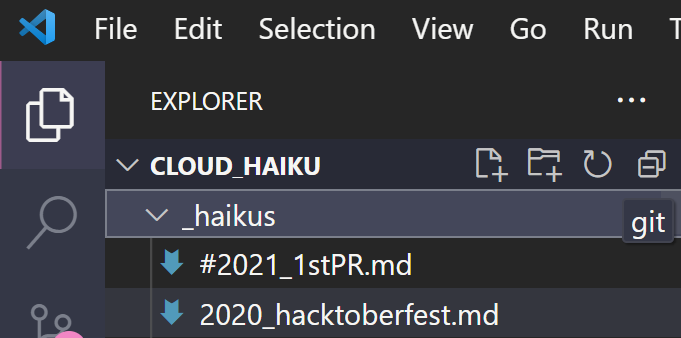
On the top left corner, below the VS Code logo there is a vertical navigation bar. Clicking the first icon in this navigation bar expands the File Explorer tab. Be sure you are in the _haikus folder of Cloud_Haiku as shown here:
Click the New File icon that's on the right side closest to the Cloud_Haiku tab as shown:
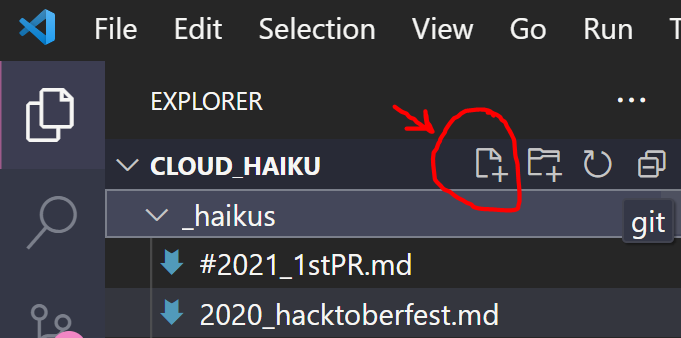
Since all the files inside the _haikus folder are in Markdown, we can name our haiku something like 'iamcodenewbie_haiku.md'. Do not forget the file extension is .md
Inside our Markdown file, let's insert the following lines:
---
layout: haiku
title: ""
author:
---
<br>
<br>
<br>
Insert the name of your haiku in the title section, and your name under the author section (or username, whichever you are comfortable with). Do not include apostrophes between your title and author name!
The conventional structure of a haiku is 3 lines: the first line has 5 syllables, the second line has 7 syllables, and the third has five syllables. Enter each line of your haiku in front of the <br> tags in the Markdown file.
Once you're done composing your haiku, hit Save (CTRL+S). Always save your work! 💾
In the File Explorer tab right-click on the file you added and select Copy Relative Path
Since we're adding a file to the repo, type the following command:
git add insert-relative-path
Replace the 'insert-relative-path' text by pasting the relative path of your haiku that you just copied. Press Enter.
The command git add adds a file/folder to the staging area. The files in the staging area are those you want to include in your next commit.
5. Commit your changes
We're now ready to commit our changes. The commit command is used to save your changes to the local repo.
Enter the following command:
git commit -m "Insert message here"
Within the apostrophes you'll want to replace the above text with a concise description that can help you and anyone else you're working with on the repo understand the changes you made. For this tutorial inserting something along the lines of "Create iamcodenewbie_haiku.md" is good enough.

Again, maintainers may have guidelines on how to format this message so check their README.md and CONTRIBUTING.md to find out.
6. Push your changes to Github
The git push command is used to upload content in your local repo to a remote repository, which in our case is our Github forked repo.
Let's enter the following command:
git push --set-upstream origin your-branch-name
Replace 'your-branch-name' with the branch name you created earlier in this tutorial.
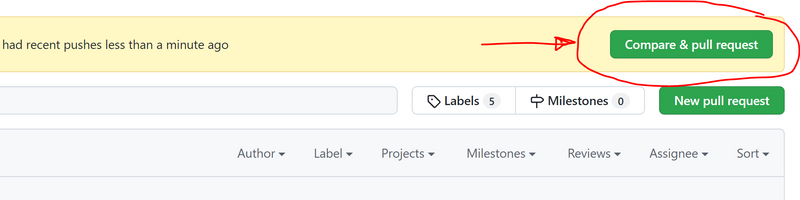
Now, go back to your Github repo. You'll see a yellow box that shows you pushed your branch on the local machine to the forked repo. To the right of that is a green button that says Compare & pull request. Click on it:
7. Create your pull request
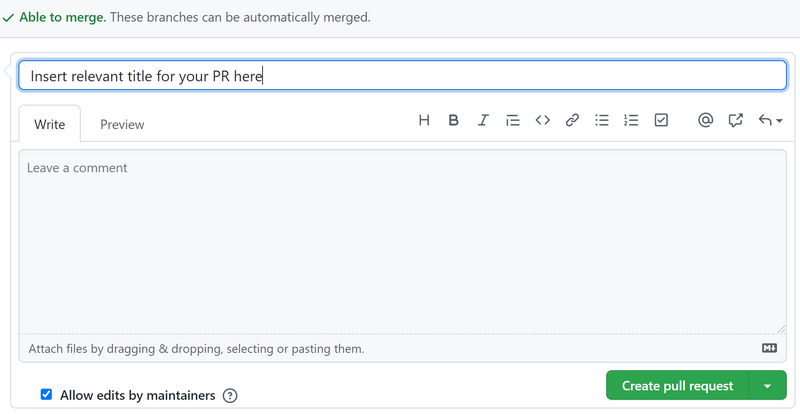
After you clicked the green Compare & pull request button in Step 6, you'll be taken to another page that says Open a pull request. Below the title in the first text area, you'll need to add a concise relevant title for your PR. Create the title. The second text area is optional for this tutorial.
Update October 18th, 2021. On the suggestion of Julien Vanier, an open source maintainer, I wanted to add this note to my tutorial. While the description in the second text area is NOT required to create and submit your first PR in this particular tutorial, it is quite important for maintainers as it helps maintainers understand and review your changes. For your future open source projects, be sure to write a description in the second text area of your Pull Request, including information about what problem you are solving and steps for the maintainers to test your changes.
Now you can click on the Create pull request button. At this point we've created our pull request that will be reviewed by the maintainers of the project. If your pull request is reviewed and approved, they can merge your PR into the repository. When your PR is merged, the changes you made are now reflected in the central repository.
Congratulations you've submitted your first PR! You're 1/4 of the way to get that sweet sweet Hacktoberfest swag, but most importantly you're learning! And isn't learning a reward in and of itself? 😁

Resources:
Videos that inspired me to write this tutorial:
DigitalOcean's Hacktoberfest 2021 Kickoff Video
Virtual Coffee's Hacktoberfest 2021 Kickoff Lunch & Learn with Dan Ott
Links to help setup git, vs code, and finding open source projects:
Installing Git
Youtube video on how to install Git
Visual Studio Code Official Download Link
Git Commands Cheatsheet
Up For Grabs - Lists open source projects to contribute to


Latest comments (13)
Here you can download old versions of snaptube. It's very easy to install and use even on pc.
Claro! Se você está procurando por informações sobre listas de IPTV M3U, recomendo visitar este site incrível. Ele oferece uma grande variedade de links de IPTV M3U atualizados para uma experiência de streaming sem interrupções. Dê uma olhada em askanydifference para mais detalhes e aproveite os melhores links disponíveis!
Great article! If you're looking for more information on how to improve your system's performance, you can read more about Driver Booster Pro and its license options on my website. It might be exactly what you're looking for!
This step-by-step guide for making your first open-source contribution is so well explained and encouraging! The process feels a bit like playing Wordle Unlimited figuring things out one step at a time until everything clicks perfectly!
"Rivermonster 777"real earning app is a remarkable addition to the adventure and survival genre. With its stunning visuals, engaging gameplay mechanics, and rich narrative, it offers players an immersive journey through a beautifully crafted world.
If you want to download entire process then prefer SnapTube for iOS. It will help you to download your videos in high quality.
File explorers typically include search and filter capabilities, making it easier to locate specific files or folders cxfileexplorerapk.net/. By entering keywords or applying filters based on file attributes (e.g., file type, date modified), users can quickly narrow down their search and find the desired files with minimal effort.
Very nice intro to contributing to open source! Would you be open to adding a sentence or two about the PR description like "The description is important to help maintainers review your changes. Include information about what problem you are solving and steps for the maintainers to test your changes." As a maintainer, the description is the most important part of a PR.
Hello Julien,
Thank you for your feedback. Being new to the open source sphere, I'm really glad to hear the perspectives of those who are more experienced with open source, like maintainers such as yourself. The addendum is no problem and I will be sure to include your suggestion in the updated version!
Nicely written, @crislanarafael ! 🙌
Thank you so much for the support Ayu! I'm hoping to write more regularly! Also, I'm now following you on here, hashnode, and polywork haha :)
And I will read them, Crislana! 😄
Woohoo! So I'll see you around! 😀
This is very well-detailed walk through of how to article. Love it!