So far we have been concentrating on learning HTML, CSS, and web design. Can you believe that this is all you need to start building your very own tech portfolio? A tech portfolio is a must for anyone who wants to work in tech or freelance.
I'll be going into more details about portfolios in the future, but I can tell you that you are ready to start putting together your projects for your portfolio. Coding tutorials are helpful in regards to getting started since they tell you exactly what code is needed and tell you where to put it. Now it is time to take off those training wheels!
Today's post is the start of a brand new HTML & CSS project. This is one of the two projects I'll be creating in the next few posts. These projects won't be a tutorial, but instead, walk you through the steps developers take every single day to launch a website live on the web.
The final week of Skillcrush 101 teaches students how to build and launch a website during the week. Throughout the week, students code two different websites. One is a portfolio site that shows students the process of building a website based on a design comp.
Skillcrush guides students through the process the entire time on the project from giving last-minute lessons on final HTML & CSS concepts to extra resources which will help along the way. The second project is a business website based on a different design comp. The second project is a bonus project students can tackle independently without a tutorial or guide to help them.
The bonus project is meant to be extra practice using HTML & CSS. Today's post will start looking at the Skillcrush portfolio site and start with lesson 17, the first lesson of the final week of Skillcrush 101. This lesson might seem like a little bit of a review of setting up your workspace and being organized, but the goal of this post is to go a little bit deeper on some of the topics I introduced. These topics include working with starter files, a better way of organizing your workspace, and a quick introduction to Photoshop.
Let me introduce the project!
Skillcrush begins week 3 by introducing the portfolio site, the main project students will be working on during the week. Below is a picture of the project I'll be making throughout this series.
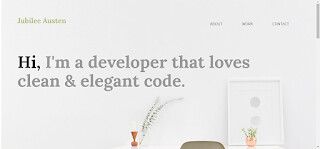
You won't be able to code along with me for this project since I'll be using all the files Skillcrush provides students for the career blueprint. You can still follow along by trying to replicate this project as best as you can or do your version of a portfolio site. Remember the goal for this project isn't building a live website. It is learning the process of taking a design and transforming it into a website.
A Couple of Notes on Skillcrus Projects
Before we dive into the main content, Skillcrush offers a couple of valuable tips. This reminder is simply the fact launching a website isn't free. Making a website costs money.
While there are low-cost and free options available, paying money to get a website live is something developers do at some point. It is just part of the job. I'll share many of Skillcrush's resources as well as the ones I use when I make websites.
Next, building a website will take a lot more time than previous projects. The process of taking a design comp and turning it into a website can vary depending on the developer you talk to, but they don't happen overnight. If you find yourself taking more time building this project than other projects you made, don't worry!
The goal isn't to get everything in this lesson in one hour. Feel free to take a break if you need it or work on this project at your own pace. I recommend scheduling time so you won't be disturbed to do the tasks in these posts.
Today's Agenda
You won't be doing very much coding in today's post. Today is all about preparation and getting organized. Now that you've seen the project, it is time to get everything ready before we even start writing lots of code.
By the end of today's post, I will have:
- Download design comp and starter files.
- Set up my workspace
- Download and install photo editing software (i.e. Photoshop)
Before you do anything, get a text editor! I will write a future post on picking a text editor and how to set one up on your computer.
1. Download design comp and starter files.
A design comp is a fancy way of saying a design file. These files are normally PSD (Photoshop) files and they contain all the content I need to make a website. Inside these files, you will find colors, fonts, images, and other important design elements needed for the website.
Web designers will try including a flat image file of the design so developers have something to refer to as they build the website. It is also helpful for developers who don't have access to Photoshop since the image is a mock-up of the site they will be building and lets them know what they will be making. Skillcrush provides the design and starter files for students in the blueprint.
I just downloaded the files. Once the files are downloaded, you should check everything in the zip file just to see what has been provided for you and will be using. The design file has the PSD file, the annotated image of the website, an image of the website with a grid overlay, and a folder with design elements I'll be using on the website (i.e. icons, images).
I renamed the design folder Skillcrush gave me as site-design. If you rename your folders like I am, make sure you use lowercase letters and hyphens between multiple words. This will prevent future problems with servers and that will mean fewer headaches for you.
Next, I downloaded the starter files zip folder from Skillcrush. The starter files folder includes a css folder, img folder, and an HTML file. Inside the css folder, I will find the style sheets needed for this project.
If you are making your style sheet or HTML files, make sure they have the right extensions so they work correctly. Once the zip folder is downloaded to my computer, I changed the name of my website folder to something that reflects what I'm building. I named my file site-code.
2. Get your workspace ready!
Now that we have all of our files, it is time to put them in a place so I can work locally on the website. Working locally is another way of saying these files are saved on my computer. The first thing I'm doing is making a folder where my project will live.
I made a folder called skillcrush-starter on my computer. Inside the folder, I drag-drop both the site-code and site-design folders inside. I put the skillcrush-starter file in a folder where I keep all my coding projects, but I recommend newbies put their project folders in a place where they can find it easily.
This can be the desktop or any place on your computer that isn't cluttered. Once you have your folders in the right place, you can open the HTML file. Inside will be the starter code or the boilerplates.
Boilerplates are templates where all the starter code is written out for you. All you need to do is add all the site content and customization. These templates normalize code for different browsers by canceling default styles so developers start with a blank slate and make a developer's job easier by saving them time from writing out a few more lines of code.
Remember these files are set up exactly the way they need to be for links to work. Skillcrush wants students to think of these files as a mirror. Everything in this folder is exactly how your files will look on a website. If you move files around, you have a good chance of breaking the relative links.
==>Click here to read the coffeecup.com article about absolute and relative paths!
==>Click here to read the css-tricks article on file paths!
3. Download and install photo-editing software (i.e. Photoshop)
Now that your workspace is ready and you have all the files, the last thing you need to do is install photo editing software. Skillcrush recommends students use Photoshop to get all the elements they need for their websites. If you already have Photoshop, you can skip this step. If you don't have this software yet, you have a few options.
Adobe
Adobe offers a seven-day free trial. This is great for those who have never used Photoshop before. Once the free trial is finished, you can use the Creative Cloud subscription service which allows you to pay on an annual or monthly plan.
You can learn more at the Adobe website. You can skip Photoshop and just use the annotated design file you got in your design files. If you have a different photo editing software, you can use that instead of Photoshop.
==> Click here to learn more about Adobe Creative Cloud, Photoshop, and other products!
If you decide to do the free trial or purchase a subscription plan, all you need to do is download the program files to your computer and just follow the installation prompts. Skillcrush has students open the design comp they provided in Photoshop once it is finished installing to see that it is working.
Low-cost alternatives to Adobe
For those skipping Photoshop, there is no judgment from me or Skillcrush. Photoshop is a great tool, but it can be expensive. While it may be an industry-standard tool developers regularly use, it makes perfect sense to go with what you can afford at the moment.
As I work through this project, I won't be using Photoshop. Although I've used Photoshop before with the free trial, I wasn't quite ready to pay for the software. For this tutorial, you will see me use either GIMP or Adobe Photoshop Elements 14.
Both are photo editing software and are low-cost options. If you would like more options, click the link below to see the Skillcrush blog post on free Photoshop alternatives.
==> Click here to see Skillcrush 5 Free Photoshop Alternatives blog post
Regardless of what software you use, take some time to become familiar with the tools you are using. This might be opening up the software and playing around with some of the tools. You can find tutorials and videos which demonstrate how to use the software.
Conclusion
That's a wrap for today's agenda. Today's post went over some extra steps in organizing your workspace and what else needs to be done before you start building a website. Today's post is introducing the first of two projects I will be starting.
Future posts in the series will walk you through the process developers take to build a website. I will be building a portfolio site using the Skillcrush files provided in the career blueprint to give you the best possible view of this process. Before I could begin building, I downloaded and organized all the important files needed for this project.
Finally, I got my photo editing software ready. It is time for another break. This will give you a chance to start playing around with photo editing software or doing some research on Photoshop if you decide to go this route.
If you are planning on following along with this post, you can use this opportunity to create a design comp of your own to use. Tomorrow, it is time to add the structure to the portfolio site. I'll be getting all the important elements from the design comp and begin using HTML to put content on my site.
This post was originally published on October 11, 2017 on the blog The Original BritishPandaChick. I made minor changes to the original post to work here on CodeNewbie.

Top comments (9)
Gold Price In Jordan is revolutionizing how investors and gold buyers stay informed, just like how smart recommendation engines enhance user experiences. With real-time updates and expert market insights, we ensure you get accurate gold price trends in Jordan without the hassle of endless searches. Stay ahead in the market with the right information at the right time.
CGPA to percentage conversion helps students understand their academic performance in percentage format. Different universities have unique formulas for conversion. For example, SPPU (Savitribai Phule Pune University) uses (CGPA × 8.8) to calculate the percentage. This conversion is essential for job applications, higher studies, and eligibility criteria in various institutions.
Photo editing is a creative process that allows users to enhance images by adjusting elements like color, contrast, and sharpness. With Photo editing tools like Lightroom Mod APK, editors can achieve professional-quality results effortlessly, transforming raw pictures into polished visuals. This process not only improves the aesthetics but also helps convey a specific mood or style, making it an essential skill for photographers and content creators.
KFC South Africa menu offers a mouthwatering menu packed with delicious options to satisfy every craving. Known for their world-famous fried chicken made with a secret blend of 11 herbs and spices, KFC serves up a variety of meals, snacks, and drinks. From classic chicken buckets and wraps to burgers, Zinger wings, and vegetarian-friendly sides, there's something for everyone. Whether you're dining solo, sharing with family, or grabbing a quick bite, KFC's menu combines bold flavors and convenience, making it a favorite for South Africans across the country.
Before building a website, it's essential to plan thoroughly. Define your goals, target audience, and content strategy. Choose the right software, such as a CMS or website builder, based on your needs and technical skills. Ensure your design is user-friendly and mobile-responsive. Consider SEO practices to optimize performance. For more guidance, this page offers comprehensive insights into website development. Additionally, secure hosting and domain registration should be done before launch. Visit this page for detailed steps on setting up your website successfully.
"Building a website from scratch requires careful planning, from setting up a workspace to organizing design files. Just like web development, photo editing also demands the right tools and structured workflow. If you're into creative projects, Lightroom apk mod old version can be a game-changer, offering premium editing features without limitations.
Freecine APK provides a seamless streaming experience, offering users a convenient way to enjoy their favorite movies and shows anytime. With its user-friendly interface and wide content selection, it enhances entertainment on the go.
To play adopt me trading value click here.
I does same for my website.