We are wrapping up the Skillcrush 101 vision board project today. On the agenda, today is adding the final CSS touches to the main.css file. These CSS touches will create highlight marks on certain texts and background colors for certain blocks.
This means creating new selectors as well as adding more CSS properties to existing selectors we already created. A lot of these properties will be margin and padding, but you will also add color and font sizes. The last thing you will do is test your CSS code to make sure everything is valid.
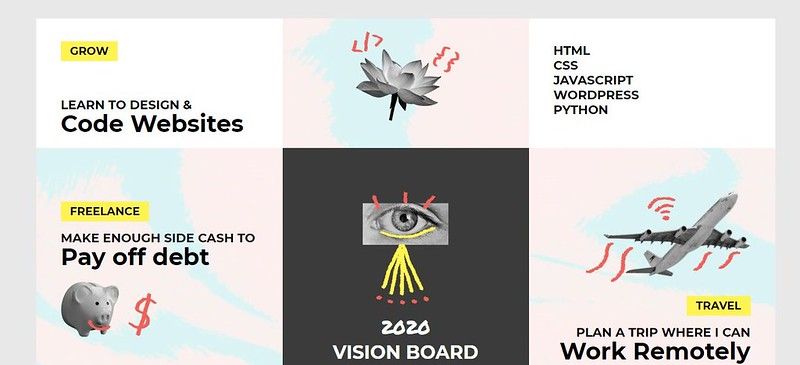
By the end of this post, your project should match the design comp and look like this image below. Let’s get started. Open your text editor.
You will need your index.html and main.css files open in different tabs. You will also want your style-guide.md file open in another tab in your text editor or the post An Introduction to the Vision Board Project open in your browser. You will need to consult the style guide documentation in this post to help you style elements throughout this post.
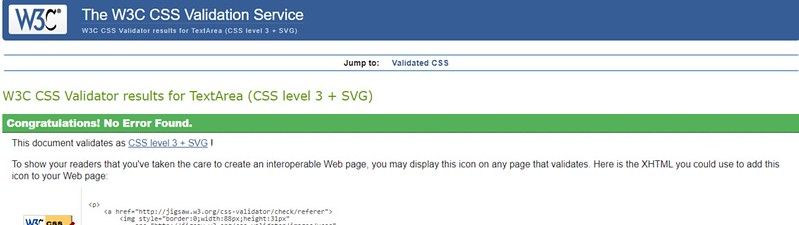
The other item you will need in this post is the W3C CSS Validation Service website. This is what we will use to test our CSS code once we are done writing the CSS. Keep this website open in a tab on your browser.
==> Click here to access the W3C CSS Validation Service website!
Objective One: Add HTML classes to your index.html
We are going to start this post in the index.html file. We are going to add some HTML classes to our div tags. When we go into the main.css file, we will use these new classes to create new selectors with style properties. This way you can ensure certain div tags have certain styles.
- Open your index.html file. Certain blocks are going to have a light background color. These blocks need a special class that lets the computer know they have a light background color.
Go to div tag one. Add the class name light-bg. Copy the light-bg class and paste it into the div tags three, seven, and nine.
/* Div One */
<div class="block small-block light-bg">
<p><span class="highlight">Grow</span></p>
<p>Learn to Design &<br><strong>Code Websites</strong></p></div>
/* Div Three */
<div class="block small-block center light-bg">
<p>
HTML<br>
CSS<br>
JavaScript<br>
WordPress<br>
Python
</p>
</div>
/* Div Seven */
<div class="block small-block center light-bg">
<p>
Walk Dog ++<br>
Meditate<br>
Yoga<br>
Snuggle Pup
</p>
</div>
/* Div Nine */
<div class="block small-block right light-bg">
<p><span class="highlight">Mind & Body</span></p>
<p>Exercise More<br>& Find Zen in<br>
<strong>Challenge</strong></p>
</div>
- Now we are going to create a class that sets a dark background color. Div five will have a dark background color. Go to div tag five. Add the class dark-bg to the class attribute.
/* Div Five */
<div class="block large-block center dark-bg">
   <img src="img/eye.png" alt="eye">
   <p class="title"><span class="marker">2020</span><br>Vision Board</p>
</div>
- A few of the blocks will need specific padding later in this lesson, but we don’t want to change the padding for the rest of the blocks. We can solve this problem by creating a new class name to adjust the padding for specific blocks. Go to div seven.
Add the class name top-padding to your class attribute. Go to div eight and add the top-padding class to the class attribute.
/* Div Seven */
<div class="block small-block top-padding center light-bg">
   <p>
     Walk Dog ++<br>
     Meditate<br>
     Yoga<br>
     Snuggle Pup
   </p>
</div>

/* Div Eight */
<div class="block small-block top-padding center">
  <img src="img/doggo.png" alt="dog">
</div>
Save your index.html file when you are done. Keep your index.html file open in the browser. We will refer back to it throughout this post.
Objective Two: Add background colors
Go to your main.css file. We are now going to start creating selectors using the class names we just created. In this objective, your goal is to give certain blocks on the vision board different background colors using the light-bg and dark-bg class names.
1.In your main.css file, create a new selector called light-bg. Inside your selector, add the background property. Set the background to the color listed in the style-guide.md documentation.
.light-bg {
    background: #FFFFFF;
}
2.Add a new selector underneath light-bg. Name this one dark-bg. The dark-bg selector will need two CSS properties.
Put the background and color properties inside your selector. Set these properties with the hex codes listed in the style-guide.md documentation.
.dark-bg {
    background: #3B3B3B;
    color: #FFFFFF;
}
3.Save your main.css and look at your vision board website in the browser. The top and bottom corners of the vision board should now have different background colors. The center of the vision board will have a different background color and the text should now be white. If you run into any issues, double-check your class name in your HTML file and your selectors in your main.css file.
Objective Three: Add styles to the title class
We are going to stay in div tag five right now and style the title in the center block. You will use the title class we gave the p tag in the index.html file to add styles to our title.
1.Go to your main.css file. Create a new selector called title. Add the font-size and margin properties.
Set the font-size to the largest font size listed in the style-guide.md documentation. Go to the title selector. Set the margin property to 10px 0.
.title {
    margin: 10px 0;
    font-size: 30px;
}
2.Save your main.css file and double-check your index.html site in the browser. The title in the center block should now have a bigger font size. It will now have some space above it so it isn’t pushed too close to the image.
Objective Four: Add padding to blocks
Now we are going to concentrate on all the other blocks in the vision board. In this objective, you want to create some padding for all the blocks in our vision board. Skillcrush gives students one hint for this step. To get the padding just right, the short blocks will need less padding than the taller blocks.
1.Go back to your main.css file. Find the large-block selector. Add the padding property. Set the padding to 70px 40px. The top and bottom padding will be 70px while the left and right sides will be 40px.
.large-block {
    padding: 70px 40px;
    height: 430px;
}
2.Find the small block selector. Add the padding property. These blocks will need less padding so set the property to 20px 40px. The left and right sides will have 40px but the top and bottom padding will be 20px.
.small-block {
    padding: 20px 40px;
    height: 210px;
}
3.Save your main.css file and check your vision board website in the browser. Each of the blocks will now have padding around the sizes.
Objective Five: Create yellow highlights
Up next are the yellow highlights on the vision board. Certain blocks have text highlighted in yellow. You are going to create this using CSS.
At the end of this objective, certain words such as “Grow” and “Freelance” will have a yellow highlight. Skillcrush provides students with another hint for this objective. The hint reminds students they will use a span element in their HTML file.
The class they set in the HTML file will be what they use in their main.css file. We’ve already done this when we set up our structural HTML file, but you can double-check your code before you begin this step using the How to Structure Your Vision Board with HTML post.
1.Go back to your main.css file. Create a new selector called highlight. The highlight selector is going to have 3 CSS properties.
The three properties you will need are padding, background, and font size. Add these properties to your highlight selector. Now let’s set the properties.
Set the background and font-size properties to the information stated in the style-guide.md documentation. Set the padding to 5px 15px.
2.Save your main.css file. Go check your vision board website in the browser. Words such as Grow and Freelance will now have a little yellow background that looks as if someone highlighted the text.
.highlight {
    padding: 5px 15px;
    background: #FFF44F;
    font-size: 18px;
}
Objective Seven: Increase font size and font weight.
We are in the home stretch with the vision board project. In this objective, we are going to concentrate on adjusting the font weight and font size of different elements. Skillcrush reminds students to use the style-guide.md documentation to help them with this step.
There is one hint to help students with this lesson. The hint reminds students to remove uppercase behavior in certain text.
1.Skillcrush wants the smallest size for the entire vision board. Go to your main.css file and find your vision board selector. Add the font-size and font-weight properties.
Set the font-size to the smallest size listed in your style-guide.md file. Set the font-weight property to 700.
#vision-board {
    width: 1200px;
    height: 850px;
    overflow: auto;
    background: url('../img/background.png');
    background-size: cover;
    font-family: 'Montserrat', sans-serif;
    font-size: 20px;
    font-weight: 700;
    text-transform: uppercase;
}
2.Next we need to adjust the font weight for the 2020 text. Create a new selector called marker. The marker selector will have two properties.
Add font-family and font-weight properties. Set the font-family property to the font listed in the style-guide.md documentation. Set the font-weight to normal.
.marker {
    font-family: 'Permanent Marker', cursive;
    font-weight: normal;
}
3.Now let’s address the hint Skillcrush has given. We will need to remove the text-transform for all the text wrapped in the strong tags. To do this, we must set the strong tag styles.
Create a selector in your main.css file called strong. The strong tag needs 3 CSS properties. Add font-size, text-transform, and line-height properties.
Set the font-size to the large font size listed in the style-guide.md file. Set the text-transform to none. Set the line-height to 38px.
strong {
    font-size: 38px;
    text-transform: none;
    line-height: 38px;
}
4.Save your main.css file. Go take a look at your vision board website to see how everything looks on your site. The 2020 text will have a different font and not be in bold. The text wrapped in strong tags will no longer be in uppercase.
Objective Eight: Add final margin and padding to the site
The last thing we need to do is make final changes to the margin and padding so it matches the design comp. We have one more objective left to create for our project. This will set the padding to certain blocks on the vision board. We will also review some of the other properties we made earlier to see if we can adjust the margin and padding.
1.Remember the top-padding class we created in objective one? We are going to use that class name to create a new selector in your main.css file. Go to your main.css file.
Make a new selector called top-padding. Inside your new selector, add the top-padding property. Set the property to 40px.
.top-padding {
    padding-top: 40px;
}
2.The last addition we need to make is getting some spacing around the sides of the vision board. Go to the vision board selector. Add the margin property. Set the margin property to 50px auto.
#vision-board {
    margin: 50px auto;
    width: 1200px;
    height: 850px;
    overflow: auto;
    background: url('../img/background.png');
    background-size: cover;
    font-family: 'Montserrat', sans-serif;
    font-size: 20px;
    font-weight: 700;
    text-transform: uppercase;
}
3.Double-check your other CSS selectors to see if you need to adjust any margin and padding. Once you are done, save your main.css file and double-check your vision board website in the browser. Your website will now have spacing all around the vision board just like the design comp. There will also be some spacing at the top of the text in blocks seven and eight.
Objective Nine: Check your CSS code
The code is officially finished on the vision board website. The final objective is to test the CSS code for any errors. This is where you are going to use the W3C CSS Validation Service website.
Go to the website in your browser tab. Pick one of the different tabs on the site. I’m using the direct input method so I can just copy-paste my code, but you can use anything you like.
Once you have your code uploaded, click the check button and wait for the results page. If you have any errors, go back to your main.css file and fix the errors. Once you’ve fixed the errors, run the test again. Keep running the test until you get a green banner that tells you there are no errors found.
Conclusion
Congratulations! The vision board website is officially complete. What you can do next is publish your website.
You can either purchase domain and hosting to get your vision board website on the web or you can publish your project on an online text editor like CodePen. Once you’ve published your website, you can add your website to your portfolio. I decided to publish my project on CodePen.
Below is a link to the vision board project I made for this tutorial. That’s a wrap on the Skillcrush 101 bonus projects. If Skillcrush adds any more projects in this course, I will cover them right away. In the meantime, make sure you keep coding and building more projects.


Oldest comments (0)