We are ready to start planning on our projects for Skillcrush 102. Now that you are familiar with the 4 principles of computational theory, you are ready to apply these principles to the LOL Cat Clock project. Lesson four of Skillcrush 102 is where students begin planning the logic for the first projects in the course.
Today's post is where you will be planning all the logic for the LOL Cat Clock. To do this, I will review some important logic tips you will use and share flowchart examples to help you visually organize and plan all the logic for your project. By the end of this post, you will have a completed flowchart for your project.
How will this project progress?
The LOL Cat Clock is an interactive clock that shows cat images at different parts of the day. When a user comes to the website, an image and greeting will appear depending on what time of day the user is on the website. For example, a user might see “Good Morning!” if they come to the site in the morning while another user might see “Good night!” if they visit the site in the evening.
Before we dive into today's lesson, here's a quick review of how the LOL Cat project will progress throughout Skillcrush 102.
- Phase One: This is where we are right now and what we will be working on today. At this stage, we are working on the logic for the LOL Cat Clock. By the end of the stage, the basic functionality for this project will be done. You will have a few time values for the morning, afternoon, and evening.
- Phase Two: This is where you begin writing code for your project. You will translate the written instructions from stage one into JavaScript code. You'll learn more JavaScript concepts in this phase as you begin writing code for your LOL Cat project.
- Phase Three: The last part of this project is where we will be adding the finishing touches to our project. A big highlight of this phase is connecting the JavaScript code we have been writing to the HTML & CSS. Other items you will be working on are the buttons and images.
Logic Concepts You Need to Know
Before you start putting your algorithm together, let’s talk about logic for a little bit. Logic is an important part of writing an algorithm. Computers love logic so developers use logic to help make the websites and apps they create work properly.
There’s a lot of logic developers use when they build projects, but today’s post is going to concentrate on two important concepts. These concepts are what you will use to create the logic for your clock.
If-else statements
The LOL Cat Clock needs to deliver a different message for certain times of the day. So users will need to see “Good morning!” and “Good day!” for different times of the day. We can accomplish this by using if-else statements.
If-else statements are something computers often use for showing logic and are used in every programming language so you will see it often. Let’s apply if and else to your project. Skillcrush keeps things easy by concentrating only on if first.
When you write the instructions for showing a certain message at certain times of the day, here’s how it would look.
IF it’s morning, THEN say “Good morning!”

IF it’s NOT morning, THEN say “Good day!”
The way these statements work is similar to true and false questions on a test. The format in the first statement is if [clause] is true, then do [x]. So when the computer reads this statement, it will check to see if it is morning before it displays “Good morning!” on the screen.
In the second statement, the format is saying if [clause] is not true, then do [y]. That means if the first statement is false, then it will do y instead. So in this example, if the computer finds that it isn’t morning, the computer will display “Good day!” instead.
Else
Let’s change the example code to include else instead of if not. Developers don’t use if not when they write if-else statements. Instead, they use else since computers read else over if not.
Although the statements below look different from the if statements we wrote earlier, they are communicating the same thing and will accomplish the same result. Plus it will keep things more concise and easier to read.
IF it’s morning, THEN say “Good Morning!”

ELSE say “Good day!!”
In this statement, else is a shorter way of telling the computer you mean everything else other than morning. You’ll see more examples of if-else statements as you continue working on the LOL Cat project. Especially as we dive into writing JavaScript for now. Right now the goal here is just understanding if and else as well as training your eye to read these statements the way a computer would.
Numbers
Computers love numbers. They are especially fans of comparing number values. So as you work on the logic for projects you create, you will want to use numbers as much as you can.
In the LOL Cat project, numbers are used to help the computer understand the difference between the different times of the day. Let’s take the statements we just wrote and see how we can incorporate numbers into them. Computers don’t know what morning, afternoon, and evening are.
So we can use numbers to help the computer identify different times of the day as well as what time it is. To figure out what time it is, you can use greater than, equal to, and less than with numbers. If you wrote this statement using this information, here’s how it might look.
IF the time is less than 12 p.m., THEN say “Good morning!”
ELSE say “Good day!”
When the computer checks this statement, it will check to see what time it is. If it is before 12 p.m., then it will display “Good morning!” to the user. This statement is better than the statements we wrote earlier because we are giving instructions to the computer in a way it will understand.
Less than, greater than, and equal to
As you write more code, you will be replacing less than, greater than, and equal to with different symbols. Using these symbols is not going to change the way you express logic. It is just going to help the computer better understand what you want it to do as well as making it easier for developers to write algorithms.
You could write an example statement just like the one below.
IF the time < 12 p.m. THEN say “Good morning!”
ELSE say “Good day!”
Now you are ready to start writing your logic for the clock messages and what times you want to use for each time of the day. You might want to write an if-else statement that uses 9 a.m. as your morning time. When you write your logic to figure out if it is the afternoon, you could use a different time to display “Good afternoon!” to the user.
Putting it together!
Now that you know some of the important logic concepts for this project, it is time to start writing the logic for the LOL Cat Clock. Writing logic for an app or website is similar to writing down a recipe. First, you need to know what you need to make a project work.
Those are your ingredients. Next, you need to write down the instructions. The instructions are the steps needed to get the project you are building to work.
For the LOL Cat Clock, you will be writing instructions for two greetings. First, you will write instructions for if the clock knows what time of day it is. Second, you will write instructions if the clock doesn’t know what time of day it is.
You won’t be writing any code in this step. Instead, you are just writing down what information you need. So find something to write or type since you will write everything down as we go.
Let’s start with the ingredients.
There are only two things you need for your clock. You just need the time of day and the messages. Put those messages down on your document.
Ingredients
* Time of day
* Messages
Up next are instructions. The first step in this project is checking the time. So step one is having the computer check what time it is.
The second step is where we will address the first objective which is knowing what time of day it is. Here’s where we are going to add an if statement. Here’s an example of what you might put below.
Instructions
1. The computer checks what time it is.

2. If you know what time it is, you put a message on the screen that says "Good day!" with a picture of a cat.
In this example, step two doesn’t include any numbers right now. It instead sticks with a simple approach of what the computer should do at all times of the day. If it can figure out the time of day at all, it will display a greeting and a cat picture.
My computer can't figure out the time of day!
The last step in this algorithm is the last objective which is what the computer should do if it isn’t able to figure out the time of day. This is another if statement, but you are welcome to use an else statement if you like. Here’s an example of what step three might look like.
3. If you don't know what time it is we post a message that says "I don't know what time of day it is! Good day anyway!"
That’s a wrap for the LOL Cat Clock logic. Once you are satisfied with your logic, save your file then keep it close by. These instructions will eventually turn into JavaScript code.
Flowcharts
Algorithms can seem very intimidating to developers. They can be especially scary for newbies just getting started with coding. Having a good plan does make them less scary and easier to deal with.
Skillcrush encourages students to use flowcharts when they plan their algorithms. Flowcharts are a great resource for developers because they visually show different results that can happen. If you have never seen an algorithm before, here’s an example of one Skillcrush sharing a fun example with their students.
==> Click here to view the xkcd flowchart!
Flowcharts work best when they follow a set of styling conventions. These conventions will help others understand what is happening throughout the entire algorithm. In Skillcrush 102, Skillcrush uses different colored shapes and symbols to help students create their flowcharts.
They provide their students with files with everything set up for their students, but you can create your flowchart using the different shapes and colors you want. I am going to use the styling conventions Skillcrush provides students throughout the Skillcrush 102 course for phase one of the course. Here’s the key to understanding all the symbols and shapes you’ll see in the example flowcharts in this series.
Start/Stop
You can use this block for the beginning and the end of the algorithm. On the flowcharts, it will be a rectangle with rounded corners and mint green. This lets people know where the algorithm starts and ends on the flowchart.
Process
The process block is a purple rectangle on the Skillcrush flowchart exercises. This lets you know when certain instructions or commands are given.
Decision
Skillcrush flowcharts use a red diamond. The diamond lets developers know this is where a choice needs to be made. This is often a yes or no decision.
Input/Output
You will see a light blue parallelogram on the Skillcrush flowcharts for this item. When you want to indicate an input or output to the computer, this is the shape you use.
Circles
Circles are used to connect different areas in an algorithm. You will see yellow circles on the Skillcrush flowcharts often throughout phase one of this course when I need to connect points.
Arrows
You will see a lot of these on your flowchart. They help show the flow within the algorithm and how things will move throughout each step of the algorithm. These will be black arrows on the Skillcrush flowchart examples.
How to translate logic statements into a flowchart?
Once you’ve created your logic statements, you can take those statements and turn them into a flowchart. Let’s take a look at one of the examples Skillcrush uses to demonstrate this with their students. Here are the logical statements we need to translate into a flowchart.
IF you want to adopt a pet, THEN go to a local shelter.
IF you meet your animal soulmate at the shelter, THEN adopt her!
ELSE go home
First, you would create a starting place for your algorithm. Then you would put an arrow moving from the starting place. In this example, users need to decide if they want a pet.
So you would put a decision diamond next to the arrow you put coming from the start. The decision diamond means users can choose between yes and no so you will need to put two arrows from the diamond to indicate what choices the user has. In Skillcrush’s example, they label these arrows with yes and no so users know which one is which.
Let’s start with the first if statement.
Users who want a pet will pick the yes route. After the yes arrow you created, put a process block. If we don’t want to adopt a pet, we can put a process block after the no arrow we created earlier to indicate we want to go home.
After you create the process block to go home, you will create another arrow that leads from that block to a stop block. This lets us end the algorithm.
Now it is time to concentrate on the second if statement
Let’s go back to the local shelter process block. Underneath that process block, add an arrow that leads to a decision diamond. This is where users will decide if they met their animal soulmate.
This decision will lead to two choices so add two arrows for the yes and no choices. If the user didn’t meet their animal soulmate, they are going to go home. We can indicate this on the algorithm by moving that arrow to the go-home process block.
In the Skillcrush example, they use a circle at the end of the no arrow from the first decision diamond. They take the arrow from the animal soulmate decision block and move it toward the yellow circle. Under the yellow circle, they create another arrow that points down toward the go-home process block.
What if the user meets their animal soulmate?
After your yes arrow, you will put a process block to indicate that the user has adopted the dog. After this block, you can create another arrow that can lead back to the go-home process block. In Skillcrush's example, they create an arrow that leads to an output parallelogram.
This will show the message “You + New animal friend!” to the user. An arrow then moves from the parallelogram back to the go-home process block. Here’s a recreation of what Skillcrush’s example looks like based on what I just described.

You will want to pay attention to the start and stop blocks on the flowchart as well as the output. Although these items weren’t included in the original statements, they are important enough to include in our flowchart. As you make more flowcharts, you can add extra items that were not part of your original logic.
Let’s get some more practice!
Before students are given the chance to make a flowchart for the LOL Cat Clock, they get some practice making a flowchart with a statement Skillcrush gives them. Below is the statement you can use to practice creating a flowchart. Skillcrush does give students a hint. The only hint is that students won’t need an output block in this exercise.
IF it’s sunny outside, THEN walk to the park!
IF it’s cloudy outside, THEN bike to the library!
ELSE stay in and read a book.
First, you need to put a start block and an arrow. First, we need to check the weather. After the arrow, we are going to put an input parallelogram.
This is where users will check what the weather is outside and input it into the computer. After the parallelogram, we are going to add an arrow. Now we are ready to start tackling the if statements.
After the arrow we just created, add a decision diamond. This will ask the users if the weather is sunny. Make sure to add two arrows from this decision diamond for yes and no.
If it is sunny outside, add a process block after the yes arrow. This process block will be for walking to the park. If it isn’t sunny outside, we are going to check if the weather is cloudy.
So after the no arrow we just created you are going to add a second decision diamond. This is where the computer will check if it is cloudy outside. You will add two more arrows for the yes and no choices that come with making a decision.
After the yes arrow, you will put a process block for the option bike to the library. If it isn’t cloudy outside, we will put a process block after the no arrow we just created. After this process block, we will put another arrow that leads to a stop block to end the logic.
Now we can end the if statements by putting arrows after the process blocks for a walk in the park and bike to the library so the point towards the stop block we created. Here’s an example of how the flowchart might look for this exercise. In this example, the arrows after the process blocks in the yes options move towards a circle.
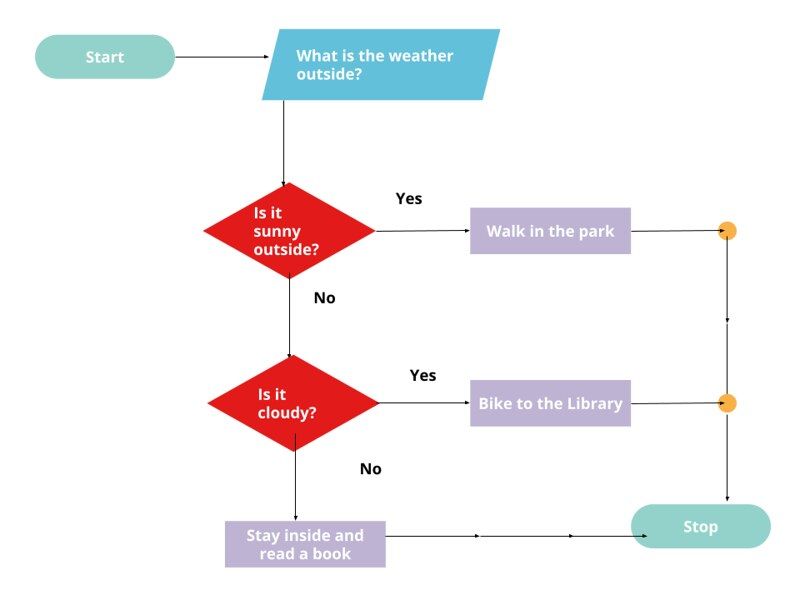
More arrows follow after each circle to indicate the flow of the logic toward the stop block. After the stay inside and read a book option, three arrows show the flow toward the stop block.
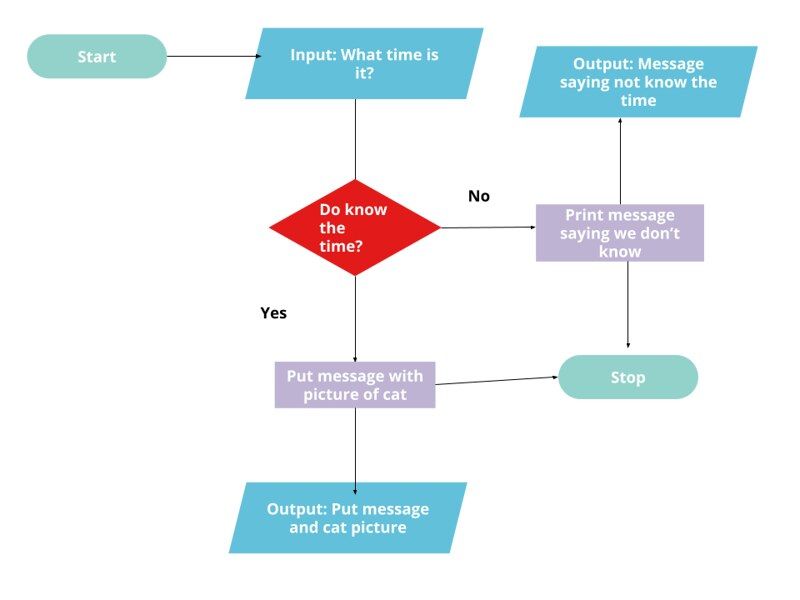
LOL Cat Flowchart
You are now ready to make the flowchart for the LOL Cat Clock. You can make this flowchart any way you like. Feel free to refer back to the examples in this post to help you put yours together.
Keep in mind this is going to be the first of many variations of this flowchart so you’ll be going back to this flowchart and making changes to it throughout Skillcrush 102. Here’s one way you could approach this flowchart. After you create the start block and an arrow, you will want to put an input parallelogram.
This is where the computer will ask what time it is. First, you need to know what time it is. So you will put an arrow that leads to a decision diamond asking what time it is.
Add two arrows for the yes and no paths you can take. Let’s start with the no path.
If you don’t know the time, we will put a process block to indicate we are printing a message that says we don’t know the time.
Add another arrow after the process block that leads to an output parallelogram. This is where it will output the message saying it doesn’t know the time. Add your third arrow after the process block that moves toward the stop block.
Now it is time to tackle the yes path. Connect the yes arrow to a process block. This block will put the message greeting to the user and show a cat picture.
Add an arrow after this block that leads to another output parallelogram. This will output the message and cat picture. Put an arrow after the process block that leads to the stop block we created.
There are many ways to approach this flowchart. Here’s an example of how a developer might approach this flowchart for this project.
Conclusion
Congratulations! You have just made three flowcharts. One is for the LOL Cat project you will be making throughout the Skillcrush 102 series.
In addition to the flowchart, you just learned about a couple of logic concepts you’ll continue to see as you move along your coding journey. If you would like some feedback on your flowcharts, share links to them in the comments. We are still in phase one of Skillcrush 102.
Up next is pseudocode. This is where you’ll be taking the instructions we’ve been writing and simplifying them before we begin writing any code. You will also be doing some final prep for the LOL Cat project so we will start writing JavaScript code soon.


Latest comments (1)
A newbie's guide to logic and flowcharts introduces essential concepts for organizing and visualizing processes or problem-solving steps. Logic diagrams and flowcharts help simplify complex information, making it easier to understand and communicate solutions effectively. Just as a goldenminiature.com/ can be a compact and lovable version of a larger breed, using flowcharts offers a streamlined approach to breaking down and managing tasks. Both tools and techniques enhance clarity and efficiency, whether in programming, project management, or everyday problem-solving.