Today's topic is important for all developers to know as they build semantic websites. Lesson 14 of Skillcrush 101 is about classes and IDs. Classes and IDs are important for developers since they keep code organized while providing another level of customization for the same elements.
You will often run into this situation as you are coding. The way to change the style of one element without affecting any of the other elements is with these new attributes. As you progress further on your coding journey, you will find yourself using classes and IDs a lot.
Just view the code of any website. You will easily find lots of classes and IDs everywhere in the HTML and the CSS. In this post, I will show you how to use classes and IDs to help customize elements on your website while keeping your code organized.
During this post, the sample code will show you how classes and IDs work in the HTML and CSS files. We will be going back and forth between these files quite a lot in this post.
What are classes?
Classes are groups of the same elements. They are a lot more flexible than IDs since they can allow many elements you want in a class. It is up to you.
In some cases, one element might have multiple classes and that is just fine. Classes are the best attribute when working with big ideas or working with lots of content. Skillcrush uses the car as an example of a class in which the different elements might include the color, brand name, and even the year of the car.
To use classes on your website, you have to start by naming some classes in your HTML file. Below is my sample code for my HTML file. I added the class attribute to one of my div tags in the main section of my site. All I did was change div to div class="main" on my site.
<div class="main">
  <h2>If you don't like something, change it.</h2>
  <div id="main-list">
    <ol>
      <li>If you don't like your job, quit.</li>
      <li>If you don't have enough time, stop watching TV.</li>
      <li>If you are looking for the love of your life, stop; They will be waiting for you when you start doing things you love.</li>
    </ol>
  </div>
</div>
Although this sample code doesn't show this, I am going to make the class name even more specific by naming it div class="main-section" so it is easier for me to read and understand later. I'll talk about this more when I discuss naming classes and IDs later in this post.
Now that the HTML is done, it is time to go to the CSS. Here is what I put in the style sheet to customize the element. If you look at a style sheet, you will use a period before the class name. This lets the computer know the element you are working with has a class.
Make sure you match your class name with the one in your HTML. The wrong name will keep your style changes from appearing in the browser. The next thing you need to do is add the style you want for this class. For my main section, I just copied and pasted everything I originally had for my h2 tags for this section and added my Wisdom font for the font family.
.main-section {
  color: red;
  font-size: 20px;
  font-family: 'Wisdom Script AI';
}

h1 {
  color: #2F4F4F;
  font-family: Arial;
  font-size: 55px;
}
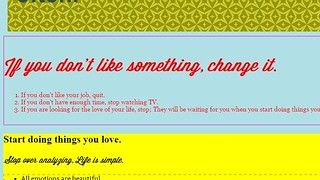
Finally, it is time to see what everything looks like in the browser. Here is how my code looks in the browser. While the image only shows a bit of this section, you can see how the color is red and how the h2 headline has the font and font size from the style sheet. The numbered list doesn't change because the list of items is set on the style sheet with its style changes.
Now let’s talk about IDs.
IDs may offer developers the chance to customize elements with different styles, but they work differently than classes. IDs are much more limited than classes since they are single identifiers. This means they work with one HTML tag.
Each HTML element can have only one ID and one of each ID per web page. The example Skillcrush uses for IDs is a social security number or a serial number for a car brand. IDs are the only ones like it on a page so that is why there is only one.
Now that we have some classes in the sample code, it is time to add some IDs. This image from my sample code shows how I added an ID to one of the sections on my site. I changed the div tag from div to div id="section1-headline". This lets the computer know this div tag is an ID.
<section>
      <div class="section-one">
        <div id="section1-headline">
                <h2>Start doing things you love.</h2>
        </div>

        <div class="section1-text">
             <p>Stop over analyzing, Life is simple.</p>
             <ul>
               <li>All emotions are beautiful.</li>
               <li>When you eat, appreciate every last bite.</li>
               <li>Open your mind, arms, and heart to new things and people, we are united in our differences.</li>
              <li>Ask the next person you see what their passion is, and share your inspiring dream with them.</li>
            </ul>
        </div>
      </div>
    </section>
The HTML is finished so we can move to the style sheet and add some CSS. The format for IDs is the same as classes but with different punctuation. This lets the computer know what type it is working with.
On my sample code, I used a hashtag to tell the computer this div tag was an ID. Once again, make sure you double-check your ID name to see if it matches the one in the HTML. If your names match, it is time to add some style.
#section1-headline {
  background: #556B2F;
  font-size: 35px;
  font-family: 'Bitter', serif;
  color: #F8F8FF;
}

ol li {
 font-size: 15px;
 font-family: Georgia;
}
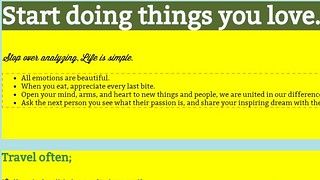
We have some CSS for our ID. Now it is time to check how everything looks in the browser. Here is how my sample code looks in the browser. The headline for this section is bigger while it has different colors for the text and background.
Naming Classes and IDs
What's in a name? Juliet might have been asking this question in Romeo and Juliet, but a name is very important in programming. Although developers can name their elements anything they want, Skillcrush teaches their students the best way to name classes and IDs.
This gives your code a good structure that will grow with your site over time. Therefore your elements need names that fit the idea of the semantic web we talked about during HTML. Skillcrush advises students to create a naming structure in which names are straightforward and intuitive which will work with your site as it gets bigger.
Remember when I named the class in my sample code? I changed the class name from div class="main" to div class="main-section". I made this change as I reviewed the two tips Skillcrush suggests for naming web elements.
As I checked the class name, I felt I could make it better so I was able to better understand what this class was meant to do. When it comes to naming your classes and IDs, you can use Skillcrush's tips like I did to see if the name for your elements fits the idea of the semantic web.
1. Does your name start with a number?
If it does, change it immediately! CSS doesn't like classes and IDs that begin with numbers. If they see one in your code, your style changes won't appear on the browser.
2. Is your name based on what it is?
This is where most developers can make mistakes. This includes me as well since I do this from time to time. The names for classes and IDs should tell developers the purpose of the element, not what it looks like.
This way another developer could look at your code and easily understand what the element is doing. It will help you in future coding sessions so you don't have to spend time changing all the names of your code. Developers like making things as easy as possible so they can spend their time on other important things on a website.
This is one of the ways developers make it easier on themselves. When I pick names for classes and IDs, I always read over my code to see if I can understand the purpose based on the name I've given. If I can't understand the purpose of the element, then I know I need to pick a better name. I make sure to assign all my classes and IDs names first. Before I begin adding style to my website, I will double-check all the names for my web elements and see if they pass both criteria.
Activity: How to make a navigation bar
Today's post features a brand-new bonus activity. I am going to walk you through the steps to add a navigation bar to your website. Many websites have a navigation bar to help you go to specific pages.
It doesn't matter if you are selling clothes or providing a service. These websites use navigation bars to help users get where they need to go. Let's start by making our navigation bar in HTML.
In your HTML file, you are going to put nav tags in your body tags. Inside the nav tags, you are going to make an unordered list. Each of the li tags will be a page you want in your navigation bar. For example, I can add a navigation bar to the sample code site. This is how my HTML would work.
<nav>
  <ul>
   <li><a href="#about-me">About Me</li> </a>
   <li><a href="#services">Services</li></a>
   <li><a href="#blog">Blog</li></a>
   <li><a href="#portfolio">Portfolio</li></a>
  </ul>
</nav>
I would also add section names within my code so the computer knows where to look. This can be shown in different ways, but here is how I would show this in my code.
<section id="about-me"></section>
<section id="services"></section>
<section id="blog"></section>
<section id="portfolio"></section>
Now that we have all the HTML, we are switching to CSS. Switch to your style sheet and begin adding some style to your website. Although there are plenty of ways to style your website, the code I'm going to show you is what you need to get it to look closely like a navigation bar.
First, you need to strip the ul styling so it doesn't look like bullet points.
ul {
  list-style-type: none;
  margin: 0;
  padding: 0;
}
Now that the bullet points are gone, we want to get the elements to line up next to each other in the navigation. This bit of code is what you need to add to make this happen.
li {
  display: inline-block;
  margin-right: 1px;
}
If I took a look at this code on my browser, I would have a basic navigation bar on my site. I can customize the navigation bar even further by changing the margin and padding. I can even add color.
You can check my pen below to see how I did mine. I added a bit of color to my navigation bar to show you one of the ways you can do it.
Conclusion
As you keep coding, you will be glad classes and ids exist. They provide an organized structure that will make it easier to customize specific elements without disrupting ones that share the same tags. The semantic web plays an important role with classes and ids, so you will want to take the time to think of thoughtful names for your elements.
Finally, I showed you how to add a navigation bar to your website thanks to ids. This is a perfect opportunity for you to add classes and ids to your code as well as try today's activity. Tomorrow, we will be looking at lesson 15, one of the last two lessons on CSS for week 2 of Skillcrush 101.
Lesson 15 goes into more detail about layouts, but the focus is on the CSS property float. I’ll be showing how to use this property as well as reviewing how document flow works on a website.
This post was originally published on May 10, 2017 on the blog The Original BritishPandaChick. I made minor changes to the original post to work here on CodeNewbie.


Latest comments (0)