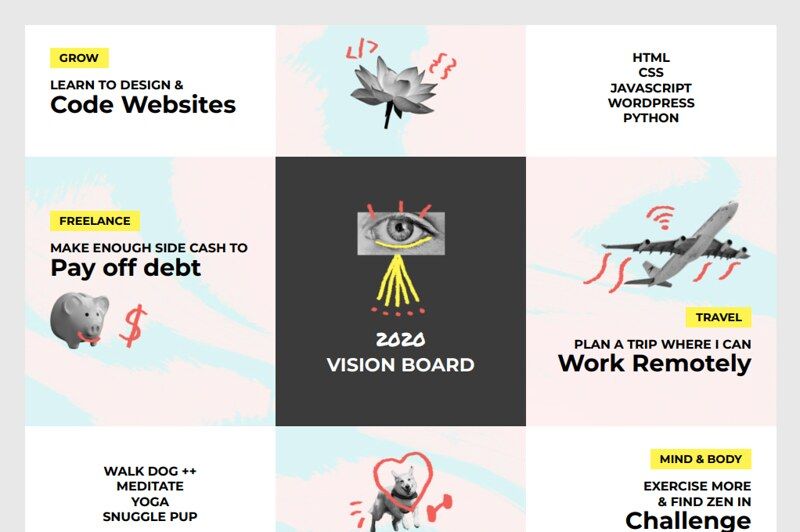
There is one more bonus project left to do in Skillcrush 101. The last project is a vision board web page. This is a static one-page website that serves as a vision board.
The board will have text and images to represent specific goals, hopes, and dreams. The vision board project is another way students can practice using HTML & CSS as well as building another project for their portfolios. Below is an image of the finished vision board website.
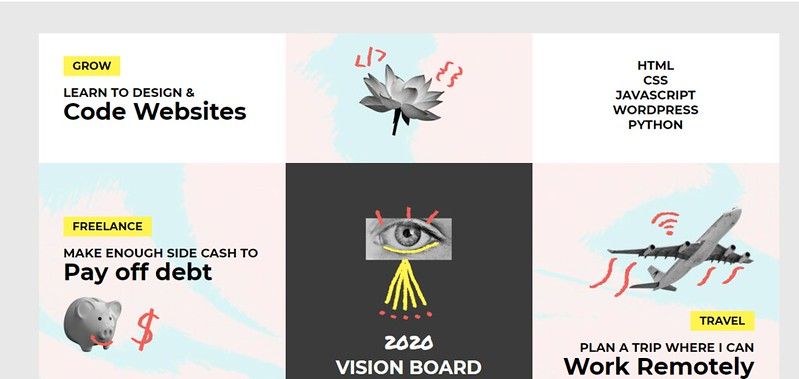
The website had nine boxes on the page. Inside each of the boxes are images or text. The boxes are split up into rows of three with three columns.
Today’s post is just a brief introduction to the vision board website. Your mission in this post is to set up your workspace for this project and get the files ready to go. You will also prepare your index.html file with some starter HTML code as well as copy and paste code in the normalize.css file. By the end of this post, your files will be ready for when we start writing code to turn it into the finished vision board website.
What is a vision board?
Vision boards are boards where people represent goals, hopes, and dreams with text and images. People cut out images and text from magazines or print off images from the web and then paste them on a poster board. Once the board is finished, people place the vision boards in a spot where they can look at them every day so they are reminded of what they are working towards.
Vision boards don’t have to be physical poster boards. I’ve seen vision boards on different Pinterest accounts. If you have a Pinterest account, you can create a new board and then save images representing your hopes and dreams inside of it. You can regularly log into Pinterest to look at your Pinterest board if you need a reminder of your goals.
There have been lots of studies done about vision boards over the years. Research has found that vision boards do help people accomplish the goals and dreams they set for themselves. Below is an article Skillcrush provides students that explains what the research has found about vision boards. If you would like to learn more about vision boards, you can search vision boards on Google and YouTube to see more examples, learn more about the benefits, and more.
==> Click here to read a HuffPost post on Vision Boards!
Project Preparation
Let’s start by preparing our workspace and getting everything we need for this project. Before you start writing any HTML code, you want to set up your workspace. Remember you can use my post How to Set Up Your Coding Workspace to help you throughout this process. You can also use the post How to Set Up Your Recipe Cards HTML File to help you with this step too since the process will be very similar.

Create a new folder on your desktop for your project. I’m naming this folder vision-board for this tutorial, but you can use any name you like here.
Open your project folder. Make the index.html file in your root directory. Inside your index.html file, you want to use the boilerplate code in the How to Set Up Your Coding Workspace guide to set up your file. Save your file when you are done and leave it open.
Add a new folder inside your root directory. Name this file css. Open your css folder. We are going to create two stylesheets.
For the first stylesheet, name the file main.css. Save this file and close it. Make the second stylesheet.
The second stylesheet will be named normalize.css. Inside your normalize.css file, you want to copy the code from the necolas.github.io and paste it inside. Save this file then close it.
==> Click here to get the code from necolas.github.io!
- Add a folder for the images inside your root directory. Name this folder anything you like. I’m going to use img for mine in this tutorial.
Inside your images folder, you want to add the images you want to use for this project. Skillcrush provides students with six png images, but you can use any images you like. I’ll be using the Skillcrush images for this tutorial. Make sure you have 6 images for your project.
The Style Guide and Design Comp
The starter files for the vision board project include a style-guide.md file. This file has all the colors and font information inside. Below is the documentation inside the stye-guide.md file.
# Vision Board Project Style Guide

## Colors:
- Yellow (#FFF44F)
- White (#FFFFFF)
- Light Gray (#E8E8E8)
- Dark Gray (#3B3B3B)

## Images
Images are in the ‘img’ folder

## Fonts
- Montserrat (700)
- Permanent Marker (normal)
- Sizes: 20px | 30px | 38px
If you want to keep this documentation as part of your project, create a new file then copy-paste all the documentation code inside. Name your file style-guide and click md as the extension before you save your file. In addition to the style guide, Skillcrush provides a link to the design comp.
You can see a screenshot of the design comp below. You can save this image to your project folder if you would like to refer to it throughout this series.
Objective: Add HTML Code
We are ready to start adding the structural HTML to our website. Skillcrush includes a starter file students can download with all the code and images they need. In today’s post, I’m going to walk you through the steps to building the starter code from scratch yourself.
At the end of this post, all the text and images will be on your website. It won’t look like much now, but as we add more CSS to the post later in the series it will transform itself into the design comp you see on the screen.
Head
Inside your head tag, make sure your meta tag has the charset attribute set to utf-8. Underneath your meta tag, have your title tag with the title of your site between the opening and closing tags. You can use any name you like for the title, but this tutorial is going to use the Skillcrush starter title Vision Board Project. Save your index.html file when you are done.
Body
Inside your body tags, we are only going to need one div tag. This div tag is going to be the board on the page. The div tag needs an id set to any name you like.
I’m going to use vision-board for this tutorial. Save your index.html when you are done.
Conclusion
You’re now ready to start building your vision board! Up next is the HTML. You will be going inside your vision-board div tag to add the images and texts so it matches the design comp. We will add a link to the Google Fonts we want to use and link our HTML file to the stylesheets.
Your vision board won’t look like the design comp just yet. That’s ok. As we get more into CSS, you’ll see your project go from text on a page to the board shown on the design comp.

Latest comments (3)
I can work with the price like this. I mean with the price of Procadis. Thanks for posting it here.
Well, these things are expensive and it is hard to buy without corporate support. But there's always an opportunity to get a used key. You haven't heard of it I guess. Find out more about navisworks manage at procadis.com . You can find pretty much any versions of this software there.
I want to buy Navisworks manage 2022, but the problem is I don't have enough money. Maybe you can suggest cheaper software alternatives?