In this third installment of the Everything, you need to know about AdonisJs series. we'll go over the basic setup of database models, using the user model. We'll also configure our registration and login controllers(authentication). Finally, I'll show you how to handle routing for endpoints.
This article will also briefly introduce you to basic lifecycle hooks in Adonis. Let's dive in.
Definitions
Authentication is the process of verifying who a user is, for example by making them enter a password.
If you're not familiar with the concept of database models, the following description succinctly defines it.
A database model is a type of data model that determines the logical structure of a database. It fundamentally determines in which manner data can be stored, organized and manipulated. The most popular example of a database model is the relational model, which uses a table-based format.
The model is essentially the data that will be manipulated in the system, it has attributes and relationships with other models.
Routes allow us to make HTTP requests to our application. The entry point for all Adonis routes is located in the start/routes.ts file. You can define all routes in this file or other files and import them into this file as we will do. For more detailed info on Adonis routes, head over to their official documentation.
HTTP methods
In most cases, you'll need your application to perform some business logic. This is where HTTP methods come in, these allow us to perform some actions on our models. Common HTTP methods include.
- GET - Used to fetch data from a specified resource.
- POST - Used to store new data or dispatch data to the server.
- PUT/PATCH - Used to update existing data.
- DELETE - Used to delete existing data.
Finally, controllers are files that all logic on the program that will be performed. A controller determines what response to send back to a user when a user makes a browser request. For example, we can have an authController that will handle all authentication logic.
Routes are tied down to controller functions. They are URL patterns that are tied down to a handler function, in this case, a function in a controller. Using the example above, we could have a login route mapping to a function in the auth controller.
From the above definitions, it's pretty clear that we're covering the MC in the MVC pattern, that is, the model and the controller.
Now we can actually get our hands dirty in setting up the user model.
Setting up the user model
A cool thing with Adonis is that it has a neat package called adonisjs/auth which handles authentication. It leverages the fully-fledged in-built authentication system of Adonis.
We'll begin by installing the package; npm i @adonisjs/auth
After successful installation, as earlier mentioned on the configuration of packages, we configure the package settings by running node ace configure @adonis/auth
This will lead the cli to prompt some questions. For my configuration, I followed the steps below.


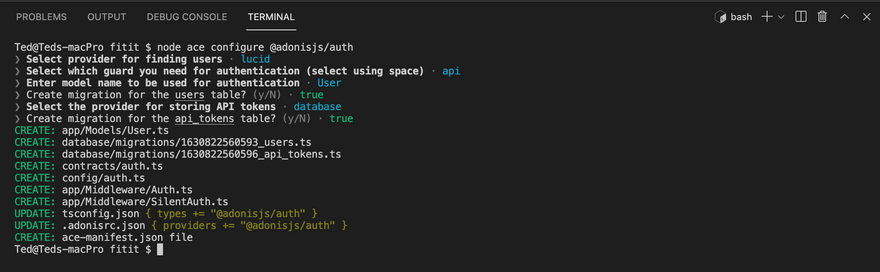
If the configuration was successful, you'll notice that some new files will be added to the file tree of your application.
These are the user migrations and user model files. The package creates a basic user model which we can modify depending on the use case.
You'll also notice that for this particular configuration, since I decided to use API token guard, then a separate migration file for API tokens has also been created.
The configuration for the auth package is stored inside the config/auth.ts file. Inside this file, you can define one or more guards to authenticate users. If you'd like to use a combination of API tokens and sessions, for example, all you'd need to invoke the node ace configure @adonisjs/auth command and add the guard you'd like to use. This will then append to the config/auth.ts file.
Modifying the user migration
Every application's user model is different. The basic model provided makes a general assumption of the common user attributes of most systems, however, to modify it to our use-case, we need to open the database/migrations/....users.ts file. Don't mind the digits.
For our application, the user table will need to look like this
import BaseSchema from '@ioc:Adonis/Lucid/Schema'

export default class UsersSchema extends BaseSchema {
  protected tableName = 'users'

  public async up() {
    this.schema.createTable(this.tableName, (table) => {
      table.increments('id').primary()
      table.string('email', 255).notNullable()
      table.string('username', 255).notNullable().unique()
      table.string('avatar').nullable()
      table.dateTime('email_verified_at').nullable()
      table.boolean('is_activated').notNullable().defaultTo(false)
      table.string('password', 180).notNullable()
      table.string('remember_me_token').nullable()

      /**
       * Uses timestampz for PostgreSQL and DATETIME2 for MSSQL
       */
      table.timestamp('created_at', { useTz: true }).notNullable()
      table.timestamp('updated_at', { useTz: true }).notNullable()

      table.index(['id', 'username'])
    })
  }

  public async down() {
    this.schema.dropTable(this.tableName)
  }
}
From the configuration above, we can see which fields we'll need our users to have. Over and above their inputs, we'll require that users verify their accounts. This will prevent bots from using our system. The implementation for this will be covered in the next section.
We'll also need to index some fields, which adonis provides. All we have to do is indicate which fields we'd like to be indexed.
For those of you not familiar with the concept of database indexing, head over to this definition.
Finally, it's time to migrate the data
node ace migration:run
If you got a successful migration, you'll see this on the command line.

It's worth noting that you might experience an error in migration related to phc-argon not being installed as a dependency. If you come across this, install this library by running npm i phc-argon2, then try running the migration again.
Modify the user model
In most cases, we'll have separate model files for each table in our database. These model files describe the columns to lucid. They also contain relationship definitions, lifecycle hooks, computed properties, serialization behavior, and query scopes. We'll dig into this at a later time.
Under the app/models directory, open the User.ts. We'll adjust it to this format.
import { DateTime } from 'luxon'
import Hash from '@ioc:Adonis/Core/Hash'
import { column, beforeSave, BaseModel } from '@ioc:Adonis/Lucid/Orm'

export default class User extends BaseModel {
  @column({ isPrimary: true })
  public id: number

  @column()
  public email: string

  @column()
  public username: string

  @column()
  public avatar: string

  @column()
  public isActivated: boolean = false

  @column.dateTime()
  public email_verified_at: DateTime

  @column({ serializeAs: null })
  public password: string

  @column.dateTime({ autoCreate: true })
  public createdAt: DateTime

  @column.dateTime({ autoCreate: true, autoUpdate: true })
  public updatedAt: DateTime

  @beforeSave()
  public static async hashPassword(user: User) {
    if (user.$dirty.password) {
      user.password = await Hash.make(user.password)
    }
  }
}
The code above is quite self-explanatory; it defines all the fields that we'd need our user model to have. However, at this point, I'd like to mention on the last bit
@beforeSave()
  public static async hashPassword(user: User) {
    if (user.$dirty.password) {
      user.password = await Hash.make(user.password)
    }
  }
This is a brief introduction to adonis lifecycle hooks. What this hook does is essentially encrypt user passwords using a hashing algorithm. This operation is performed right before a user is saved into the database, hence the beforeSave() function. We wouldn't want to store user passwords as raw texts. You can perform other lifecycle operations using any of these hooks in adonis
beforeSave(), beforeCreate(), beforeUpdate(), beforeDestroy(), beforeFind(), afterFind(),beforeFetch(), afterFetch(), beforePaginate(), afterPaginate()
Creating our Auth Controller
For the next step, we will make a controller that will handle all user authentication. We do this by running
node ace make:controller Users/AuthController
You'll notice that a new directory has been created under the app/Controllers/Http.
Open up the AuthController file and paste the following code.
import { HttpContextContract } from '@ioc:Adonis/Core/HttpContext'
import User from 'App/Models/User'
import { rules, schema } from '@ioc:Adonis/Core/Validator'

export default class AuthController {
  public async register({ request, response }: HttpContextContract) {
    // validate email
    const validations = await schema.create({
      email: schema.string({}, [rules.email(), rules.unique({ table: 'users', column: 'email' })]),
      password: schema.string({}, [rules.confirmed()]),
      username: schema.string({}, [rules.unique({ table: 'users', column: 'username' })]),
    })
    const data = await request.validate({ schema: validations })
    const user = await User.create(data)
    return response.created(user)
  }

  //   login function
  public async login({ request, response, auth }: HttpContextContract) {
    const password = await request.input('password')
    const email = await request.input('email')

    try {
      const token = await auth.use('api').attempt(email, password, {
        expiresIn: '24hours',
      })
      return token.toJSON()
    } catch {
      return response
        .status(400)
        .send({ error: { message: 'User with provided credentials could not be found' } })
    }
  }

  //   logout function
  public async logout({ auth, response }: HttpContextContract) {
    await auth.logout()
    return response.status(200)
  }
}
So what does the code above do?
Registration
There are three functions within this controller;
The first one being the registration of users.
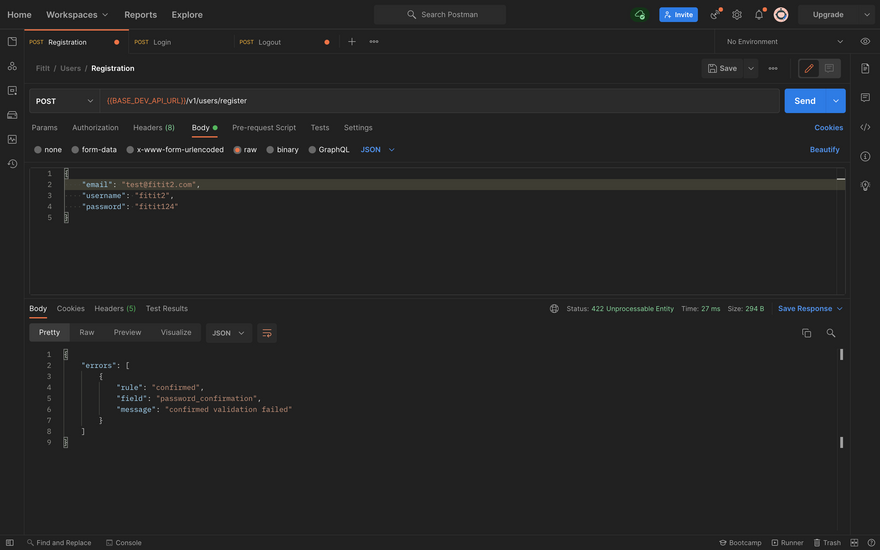
We have some validators that ensure that the data being input meets certain requirements, in our case, the email and username fields should be unique. The password field should also be entered twice, that is, have a password confirmation field that matches the password.
If the user input meets the set validations, then the system creates a record of the user in the database.
Login
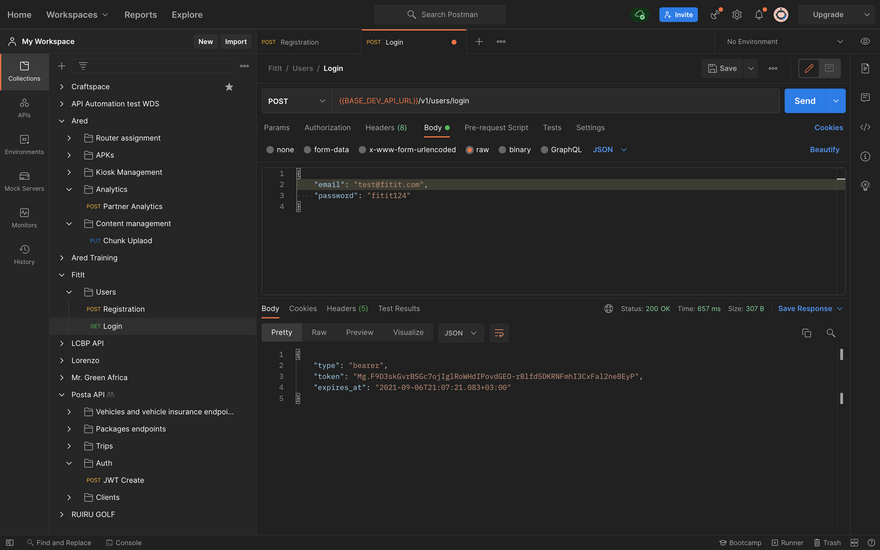
The login functionality of our application will handle the authorization of users. We'll require that users enter an email and password. If the two match against a user in the database, then we return an API token that gives the user access to our system.
This token will validate all requests from the user and will only be valid for 24 hours.
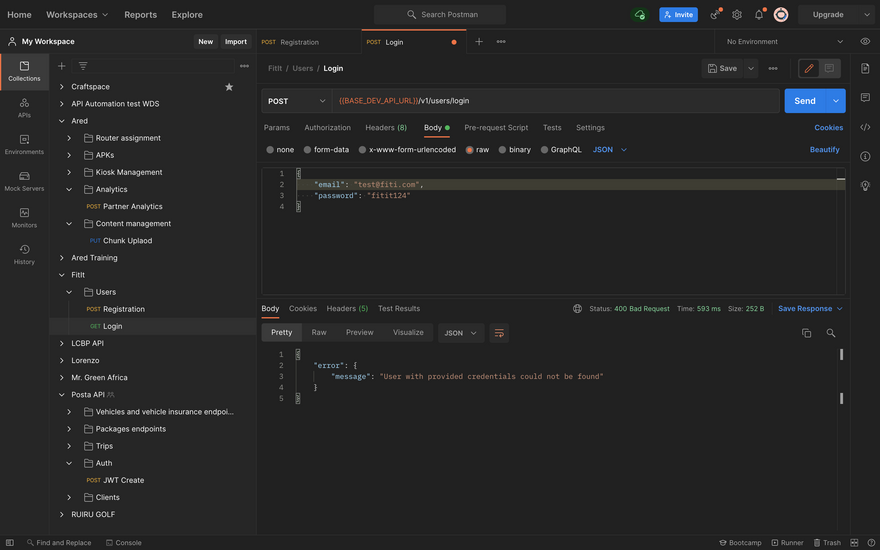
In a case where the user enters the wrong credentials, the system will throw an error with an appropriate response message.
Logout
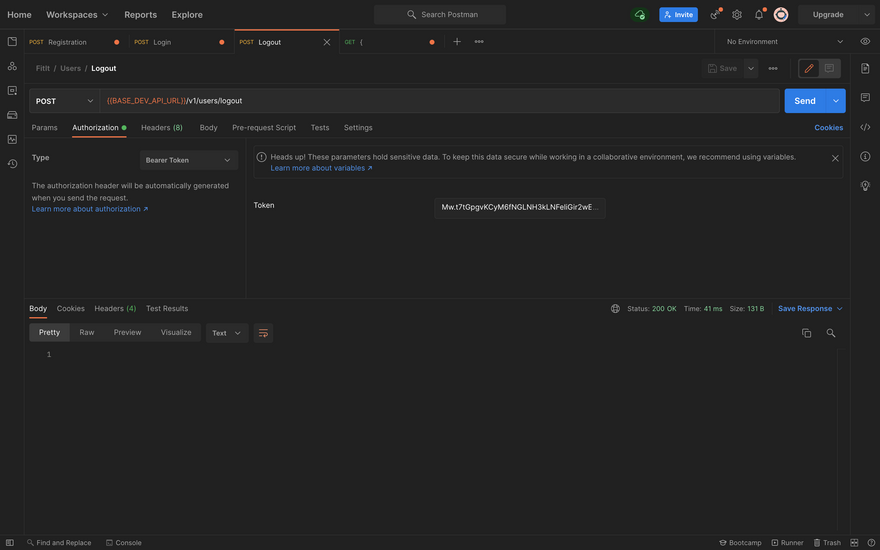
Finally, we will need users to also be able to log out when they need to. The logout() function helps us achieve this.
Defining User Routes
Next, navigate to the start directory and create a new directory called routes, under it make a file named users.ts . Therefore your start directory should be looking like start/routes/users.ts. Paste the following;
import Route from '@ioc:Adonis/Core/Route'

Route.group(() => {
  // registration logic
  Route.post('register', 'Users/AuthController.register').as('register')
  Route.post('login', 'Users/AuthController.login').as('login')
  Route.post('logout', 'Users/AuthController.logout').as('logout')
}).prefix('api/v1/users/')
The above defines the user-related URLs that our application will be having.
The prefix keyword means that all URLs within the Route group will be prepended with the api/v1/users pattern.
For now, all the routes use POST requests, but not to worry, we'll see how to use other HTTP methods in upcoming articles.
I'll take a dive into its functionality, but before then we need to inject the user routes into the entry point of all routes for our application. This is the start/routes.ts file.
Open the file and modify it such that its contents are like this;
import HealthCheck from '@ioc:Adonis/Core/HealthCheck'
import Route from '@ioc:Adonis/Core/Route'

import './routes/users.ts'

// check db connection
Route.get('health', async ({ response }) => {
  const report = await HealthCheck.getReport()

  return report.healthy ? response.ok(report) : response.badRequest(report)
})
Testing
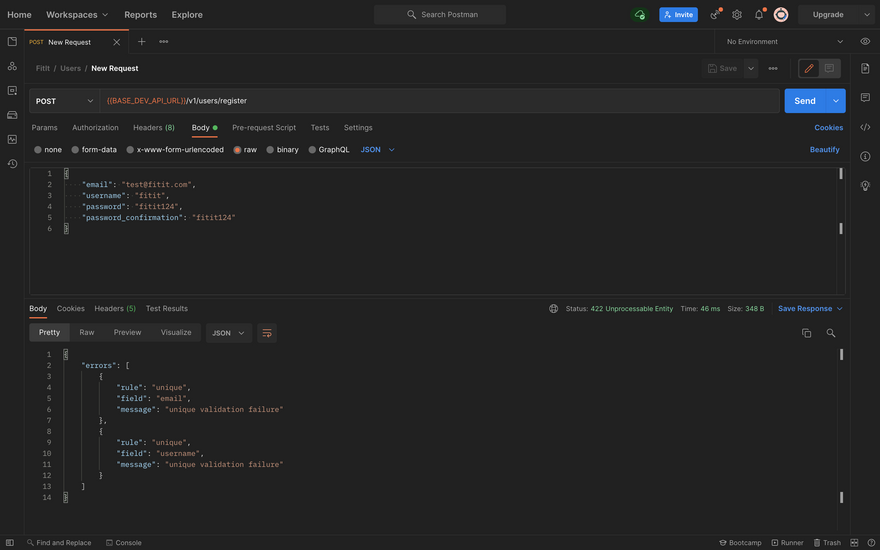
We will be using postman for testing, for my setup, I've made a collection and added a global URL variable called BASE_DEV_API_URL, which is basically, http://localhost:3333/api
Next, I've added the three requests we've just created above and tested them out. We'll cover different scenarios, using different inputs.
- User registration
Successful registration

Unique fail for email and username
This error will occur when an email and username fail to meet the uniqueness validator.
Password Confirmation Missing
- Login
Successful Login
Wrong login credentials
- Logout
For the logout functionality, copy the bearer token of a logged in user and pass it as an authorization type of
Bearer tokenunder the authorization tab in Postman. Hit thehttp:/localhost:3333/api/v1/users/logouturl. The result, if successful should be a status 200.
Conclusion.
Congratulations! You've made it to the end of the tutorial. I hope you're following along just fine. In this article, we've learnt to setup an authentication scheme in Adonis, gotten introduced to controllers and validators and finally, done some basic HTTP routing.
In case of any query, feel free to shoot a DM or comment on the post below.
All the source code of the above application can be found here
For the next part of the series, we'll cover Relationships, by setting up more models. See you on the next piece!


Oldest comments (0)