Converting a design into code used to be a lengthy process with lots of back and forth between design and development teams. The handoff process could create bottlenecks and slow down product creation, as the whole process was very manual and sometimes required trial and error and lots of thinking to see if it was viable and practical to build out a new feature or component. These days, the process is considerably less intensive and even more improved because of the sheer magnitude of vibe coding tools available on the market.
Vibe coding has revolutionised the way designers and developers work because now artificial intelligence can understand both your design and code files, making it a pretty straightforward process to generate working applications. Struggling over complex designs is now a thing of the past because AI is capable of turning static designs into working functional code.
In today's article, we are going to look at two of the leading design-to-code vibe coding platforms, which are Anima Playground and Figma Make. Both of them are designed to convert a Figma design into a fully coded application. Anima Playground is a fantastic external platform which has a Figma extension, whereas Figma Make is built into Figma.
This is a worthwhile practical comparison because choosing the wrong tool can result in a less-than-optimal workflow that requires a lot of hands-on work, which can cause unnecessary frustration. In this project, we will put both tools through the paces as we compare the same Figma design by using the same vibe-coded prompts. This will allow us to see how each platform handles everything, starting with the basic design and then converting it to a more complex interactive application. By the end of this article, it should be more obvious how these two platforms compare, making it easier to make an informed decision on which to use.
What Are Vibe-Coding Tools?
Vibe coding tools are essentially AI powered platforms that can understand design decisions and thinking processes through natural language prompts. This means that they are capable of transforming static designs into functional applications and no traditional coding is required. In traditional workflows a developer would manually build out a design by hand using code. AI powered workflows on the other hand use conversational language such as "make this section interactive" or "add a loading animation to this section". The AI would then analyse the visual as well as the users' prompt to generate the required code and this basically bridges the gap between the design and technical implementation.
What Are Anima Playground and Figma Make?
Anima Playground
Anima Playground is a design-to-code platform which is a powerful tool for converting Figma designs into full functional apps. Anima allows users to import any Figma design and then use natural language prompts for adding the interaction, logic and more advanced functionality. The platform has been in Beta for a while and, is capable of generating clean and production-ready code for the popular JavaScript framework React.
Figma Make
Figma Make is basically Figma's official AI-powered design to code solution which is built into the Figma ecosystem as part of their AI implementation. The tool can convert static designs and Figma designs into code which is a great way for designers to create quick prototypes which can be handed off to developers. As of writing Figma Make is still in early Beta and is not available on the free Starter plan. It's only accessible via the Full seat paid plan.
Working On Our Figma Project
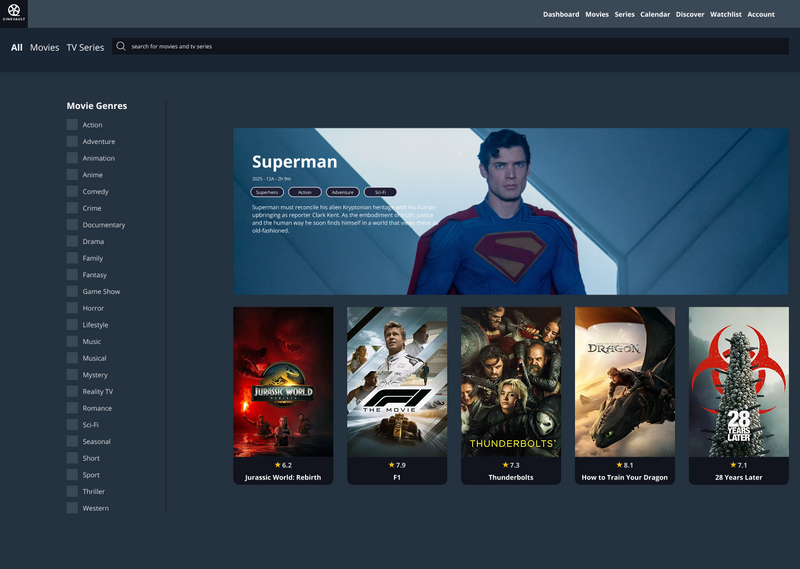
The design which we will be working on in this project is for a Movie Database website like IMDB.
You can take a look at the design below:
The design is fairly simple, and uses Auto Layout and components to make the layout easier to manage. It's not that complex, so it should be pretty easy to vibe code.
Ok, before we start vibe coding, the first step will be to quickly run through the setup for both Anima Playground and Figma Make so we can see how they convert a Figma design into code.
Anima Design To Code Workflow
The first step is to install the Anima - Figma to Code React Dev Mode plugin for Figma. Once that is done you need to switch to Dev Mode and then you should see the Anima Plugin somewhere on the right. Clicking on the button will start the design-to-code conversion process.
After the conversion process has been completed, you should see an Open Playground button in the right sidebar. Clicking it should take you to the Anima platform, which should open in a web browser window.
The Anima Platform will start to convert the design to code as you can see here:
You should now see the completed design created using Vite if the server does not start automatically you can use the usual run command to start the server which is npm run dev.
As you can see the code more or less matches the design which is not too bad for a first attempt. There are a few areas which could do with a bit of spacing but those are minor fixes and we haven't even started to write any prompts yet so its a good first start. Its worth mentioning that it's not currently responsive and none of the logic or functionality works yet, which is ok because the first step is design anyway.
And here is a snapshot of what the codebase looks like:
Anima is using the Vite framework to build a React project.
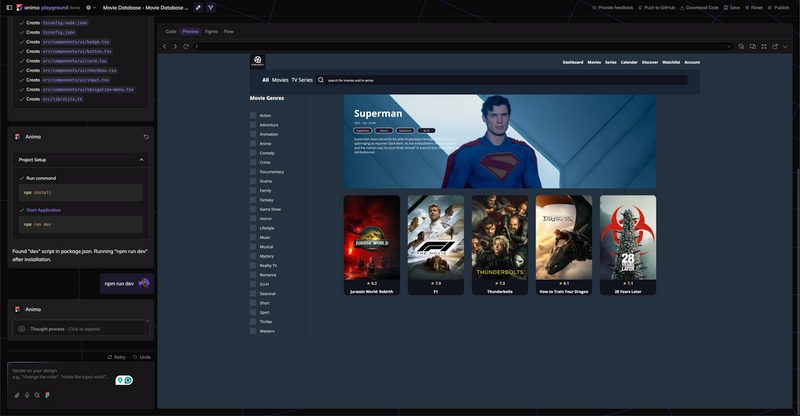
Here we can see the app in action:
Figma Make Design To Code Workflow
The Figma Make setup is slightly different because its built into Figma. It's still in early Beta so the setup might change a little bit in the future. To begin with open a New file in Figma and click on the Make button which is at the end on the right as shown here:
You might see a getting started screen, especially if this is your first time using the tool:
You should now see the Figma Make interface screen.
In the bottom left-hand corner there is a prompt box for writing your commands and attaching media. You need to go to your Figma design file for your website or application, select it and then copy it. This can be done by right-clicking the menu and selecting copy or using the usual keyboard shortcuts for copying. Take the copied file data and paste it into the prompt box and it should attach as an image. Alternatively, you could export the design as an image and then attach it manually.
Lastly, we just have to tell Figma Make to convert the design into a website. I used this prompt command to do so: Build a website based on this design.
And this was the website Figma Make created after the prompt.
Figma Make did an ok job of converting the design however the hero image is clearly broken and the movie list is partly inside of its container. Also Figma Make hallucinated and added a second row of movies which was not part of the original design. Its not all bad news though because the website is almost fully responsive right from the start and surprisingly the search box and the checklist on the left work. So that's pretty impressive despite the design not being quite accurate.
And here is a snapshot of what the codebase looks like:
Figma Make appears to be using some custom Next.js code to create a React codebase.
Here we can see the app in action:
Head-to-Head Comparison
Now let's do a head-to-head and with some vibe coding tests, to see how both platforms compare when we make changes.
Test 1: Adding a new section
Prompt Used
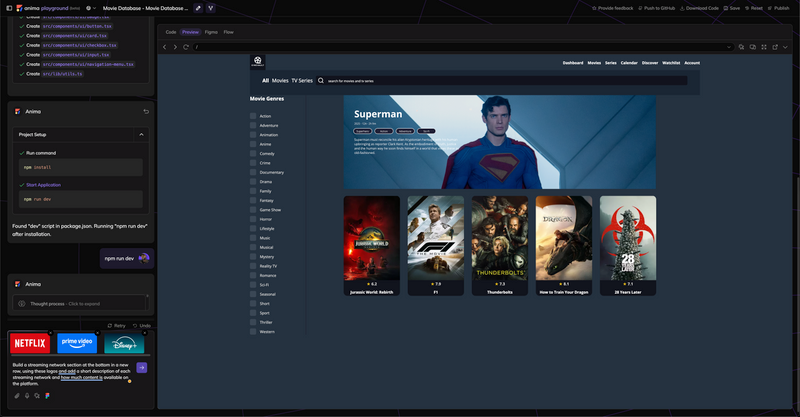
Build a streaming network section at the bottom in a new row, using these logos and add a short description of each streaming network and how much content is available on the platform.
Anima Playground Results
The first image shows the initial prompt with the logos attached for Netflix, Amazon Prime Video and Disney+:
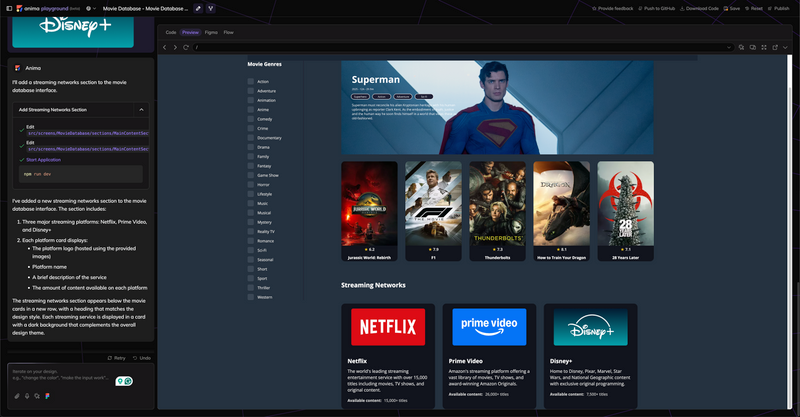
The second image shows the completed design after the prompt:
Figma Make Results
The first image has our prompt like before, with the logos for Netflix, Amazon Prime Video and Disney+:
The second image shows the updated design with the new section:
Verdict
Winner: Anima 🏆
Anima wins this first round because it's possible to attach multiple images as part of the prompt. I'm not sure what the limit is, but I was able to attach at least 6 images. This is important because I wanted to add more than 3 streaming networks, but was limited to 3 with Figma Make, so I had to settle for this design. I suppose I could have added more logos with a second prompt, but regardless, it would have shown that Anima is slightly more capable in this area. Both designs do look good, though, and follow the prompt, although the Anima design is slightly better overall because the content is not outside of the container.
Test 2: Changing the style
Prompt Used
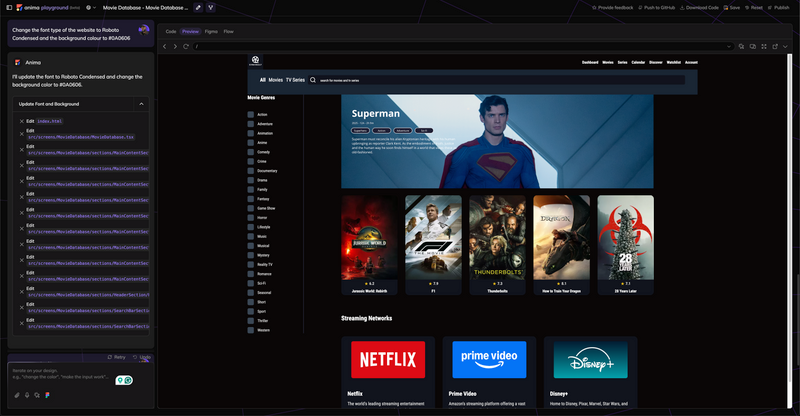
Change the font type of the website to Roboto Condensed and the background colour to #0A0606
Anima Playground Results
In this image we can see how the website has been updated with a different background colour and font style:
Figma Make Results
This is how our website looks in Figma Make after the new updates:
Verdict
Winner: Draw 🤝
It's a draw, although I should mention that Anima Playground changed the background colour for the header, and Figma Make left it the same. Whether the header background can be considered part of the overall background for the website is subjective I guess.
Test 3: Modifying the layout
Prompt Used
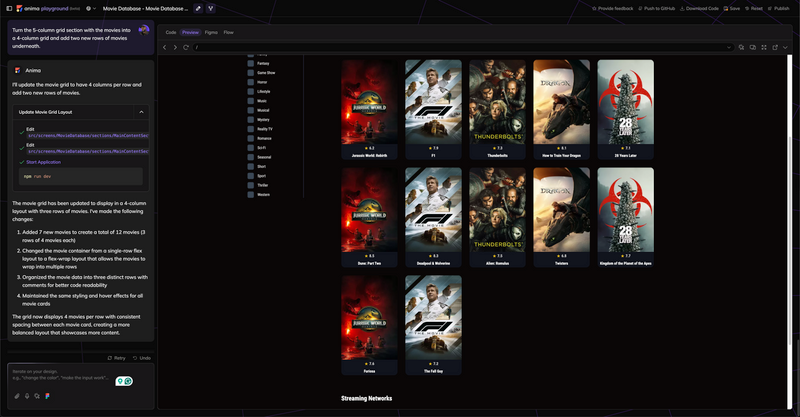
Turn the 5-column grid section with the movies into a 4-column grid and add two new rows of movies underneath.
Anima Playground Results
This is how our website looks after the update:
Figma Make Results
And this is how our website looks in Figma Make after the update:
Verdict
Winner: Anima 🏆
Anima gets the win here because it more closely followed the original prompt. They both had a slightly different approach to this prompt. Anima Playground is duplicating the content and creating new rows, which is fine because the design is correct and follows the prompt.
Figma Make created too many rows because it was hallucinating at the start when it created more content than needed, which was not part of the original design. So it has created two rows for every one row I requested. It did manage to find images for the new content though and they are sized well although not all of the movies have images.
Test 4: Updating the CTA section
Prompts Used
Prompt 1
Update the text in the Superman hero section at the top to this:
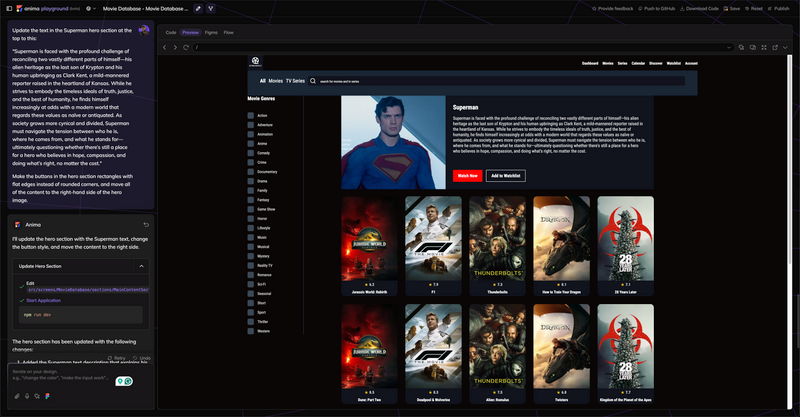
"Superman is faced with the profound challenge of reconciling two vastly different parts of himself—his alien heritage as the last son of Krypton and his human upbringing as Clark Kent, a mild-mannered reporter raised in the heartland of Kansas. While he strives to embody the timeless ideals of truth, justice, and the best of humanity, he finds himself increasingly at odds with a modern world that regards these values as naïve or antiquated. As society grows more cynical and divided, Superman must navigate the tension between who he is, where he comes from, and what he stands for—ultimately questioning whether there’s still a place for a hero who believes in hope, compassion, and doing what’s right, no matter the cost."
Make the buttons in the hero section rectangles with flat edges instead of rounded corners, and move all of the content to the right-hand side of the hero image.
Prompt 2
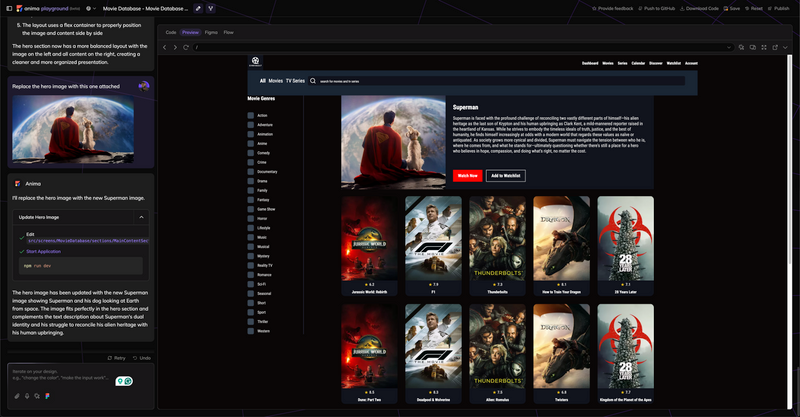
Replace the hero image with this one attached
Anima Playground Results
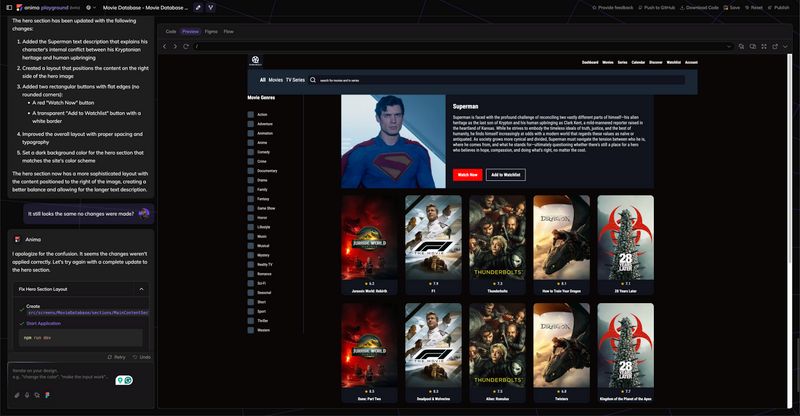
I actually had to use two prompts because the first time Anima did not make the changes for some reason:
After making Anima aware that the changes were not visible, it noticed the error and fixed them in the second attempt:
In the final prompt, I got Anima to change the image in the hero:
Figma Make Results
Here is how our hero image looks after the first prompt:
And this is what it looks like after the second prompt:
Verdict
Winner: Anima 🏆
So first, Anima slightly changed the design with some hallucination and added buttons for Watch Now and Add to Watchlist. I do think it's an improvement because moving the content to the right meant that it was now covering Superman's face which is why I had a second prompt to change the image. Anima seperated the image and the content which was a good fix, I might have made eventually.
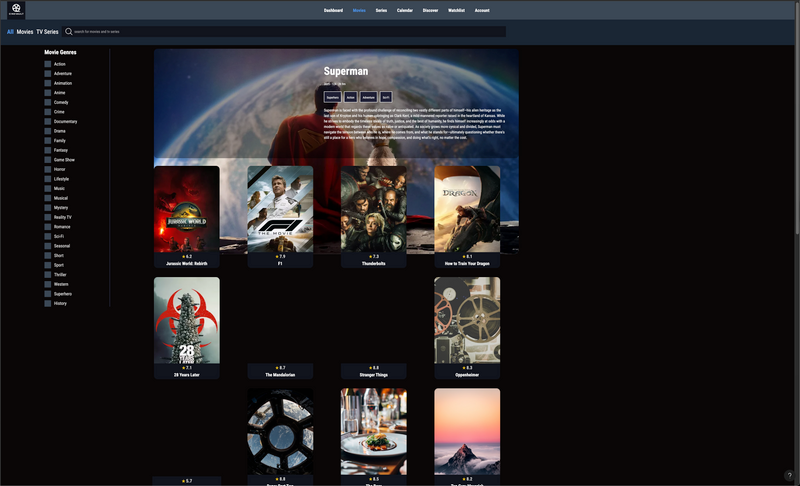
Figma Make followed the prompt more accurately this time, but the hero image is still broken, whereas it's been fine in Anima since the beginning. Both were successful in changing the hero image, though.
In the final round, I will just give the edge to Anima because it's clear to see that the website is much cleaner and closer to a final design. Sure, there might be duplicated content, but Anima did follow the prompt, whereas Figma Make hallucinated more and focused more on functionality instead of getting the code to match the design, which is the first step. More work and vibe coding would be required to get the coded design to the same level as Anima.
Figma Make did do a good job with my prompt for the hero section, though, but it does not change the fact that the hero section and overall design look more broken when compared to Anima.
We can see the final design for both platforms below:
The website created in Anima looks the best visually, in my opinion. The design is much cleaner and none of the elements appear to be broken.
The website created in Figma Make has a broken hero image, hallucinated content and missing images for some movie titles. The header has a different background colour to the one in the Anima build. This is a bit subjective because I did say change the background colour but it can be debated that this included the header too. The content is still broken and falls out of the containers when the page scrolls.
Despite these errors Figma Make did manage to make the website responsive and the functionality was working for the list and search bar. However, this initial phase of building was for the design; the functionality would have come next, so it still loses a few points because more vibe coding would be needed to resolve the broken design.
So the final score is:
Anima: 🏆🏆🏆🏆
Figma Make: 🏆
Key Differences Revealed
Ok let's see how both tools compare overall as we break it down into the areas of code quality, page accuracy, editability and handoff readiness.
Code Quality
Anima
Anima Playground tends to generate clean, readable and semantic code which is usable. The code is created using the Vite framework, and the codebase is written in React with good component driven design. This is very good for scalability and production.
Figma Make
Figma Make seems to output a lot of bloated code with many divs and spans, which is not very readable. The codebase seems to be using a custom build of Next.js because I noticed the 'use client' directive.
Page Accuracy
Anima
Anima did a much better job at capturing everything on the screen and there was far less hallucination, especially with the initial design to build phase.
Figma Make
Figma Make can sometimes miss content on longer pages, especially if it's below the fold. There was also more hallucination, and it was unable to match the initial design as the page was broken at the hero section.
Editability
Anima
Anima Playground felt more usable, especially when making changes which were easier and the results were usually instant.
Figma Make
Figma Make felt more like a black box due to having more hallucinations so more work is required to get the desired result.
Handoff Readiness
Anima
Playground can output production-ready code which has structure, assets and styling so it is much better for development purposes.
Figma Make
The output from Figma Make would require more hands-on work to get it up to a production-ready standard.
Practical Considerations
As of writing, Anima has a free option as well as Pro, Business and Enterprise plans. Figma Make is currently in beta and not available on the free starter plan. If you want to use Figma Make, you will have to pay for the Full seat plan. Either way you need to purchase at the very least a Figma Dev seat plan so that you can use the Dev Mode, which is required for using most Figma plugins anyway.
In terms of workflow integration both tools are a fairly good choice because they can convert designs to code and fairly well. Performance is slightly better in Anima because Figma Make has been in Beta for a shorter time whereas the Anima Platform is more stable.
Anima Playground is also available on the web alongside the Figma plugin whereas Figma Make must be used inside of the Figma platform.
If I had to use one of these tools for a real-life project, I would choose Anima because the platform has been around for longer and is far more stable and feature-rich. Like being able to push your codebase to a GIT repository and the fact that the codebase is more production-ready. I also like the fact that you can attach a lot more images alongside your prompts, which means it would take fewer actions to get work done.
My overall thoughts on my experience after using both platforms are that productivity can be significantly increased when using Vibe coding tools, and this is good because it means more work can be accomplished in a much shorter time frame. Both the design and codebase are easily accessible, so designers and programmers can continue doing what they do best without having to change context.
Conclusion
The design to code vibe coding space is hot and Anima and Figma Make are two great platforms to use. At this point in time Anima Playground feels like a more polished product as it has been in the beta phase longer and the tool just does a much better job of following prompts and getting a codebase to match a Figma design.
Anima Playground is right up there as one of the best vibe coding platforms and easily competes with some of the other names, like Bolt.new, Lovable, Replit and v0 by Vercel.














Top comments (0)