Learn more about neural networks and how they work in general in one of our previous materials with comics. This article is a guide to how to work with them on iOS. And in particular, how to implement speech recognition and characterize what's recognized. With code examples.
We will explain it with an example /solution that we have developed for one of our projects. Starting with quick intro into the framework we will be using, we'll then proceed to creating a model, training it with your app data, and analyzing results.
What framework to use: about CoreML
CML (Core Machine Learning) - is an Apple framework for implementing machine learning to an iOS app. Apple built it in 2016 as a supplement to what they had on working with matrixes and vector algebra (together building up the Accelerate framework) and computing based on the Metal graphic technology - core neural network tools.
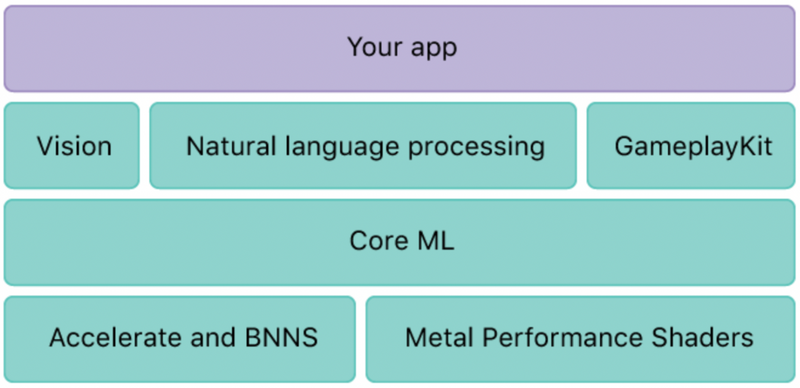
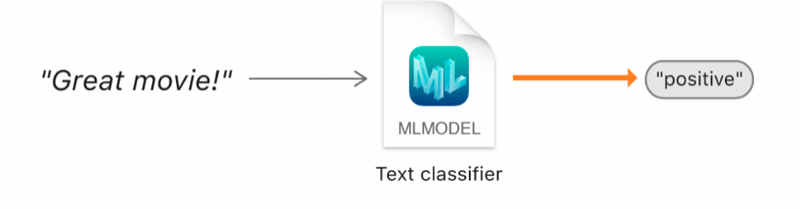
CoreML has nothing to do with neural network training. It is only able to import a ready-made, trained model and provide the developer with a user-friendly interface to work with it in the application. For example, we submit the text to the input of the ML model and get its classification at the output.
For that CoreML integrates a fully trained model, it provides a powerful flexible tool for working with neural networks. It is possible to import almost all popular neural networks:
- BERT, GPT - for tasks with natural language, the one we speak every day,
- neural networks for image classification, etc.
There's just one limitation: the number of tensor components must be <= 5. That is, no more than 5 dimensions.
We should mention what a neural network model is. This is the result of neural network training that contains a weighted graph with the best combination of weights. And gives out a result at the output.
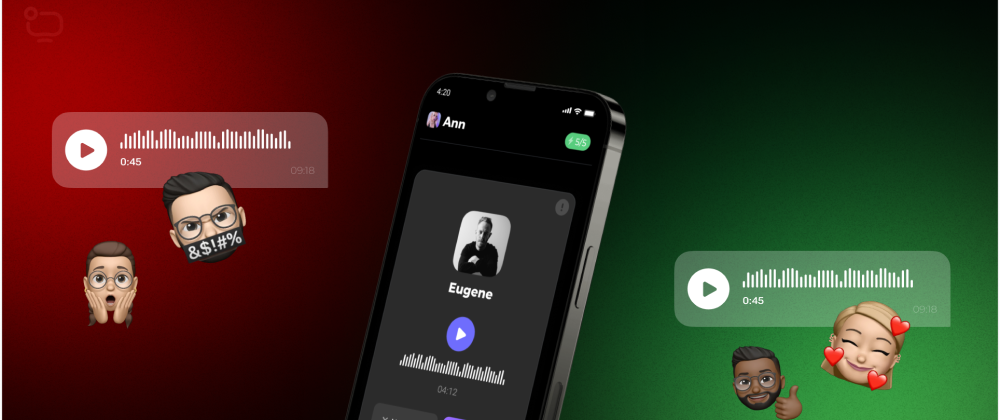
How to determine the phrase toxicity on iOS in real-time?
You can apply the algorithm below to characterizing speech in general. But to exemplify, we'll focus on the toxicity.
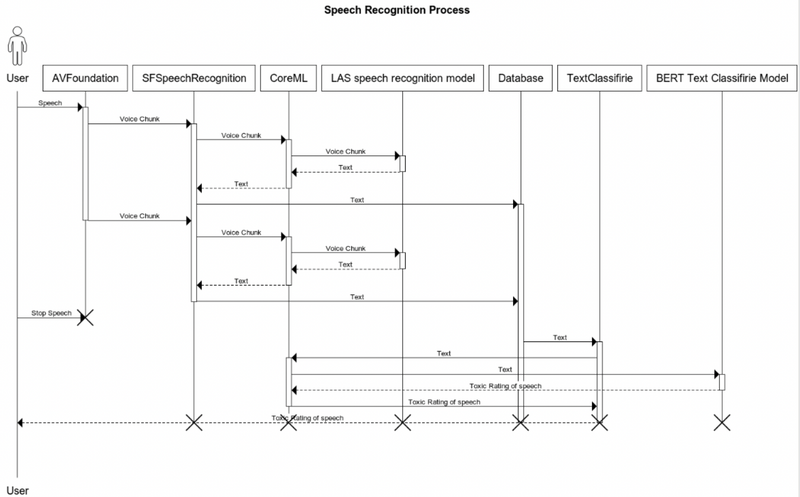
So, to determine the toxicity of a phrase, you need to divide the problem into several phases:
- Prepare training data with toxic and non-toxic phrases;
- Obtain a model of the neural network trained on the data set;
- Write down the phrase;
- Send the phrase to the SFSpeechRecognition library for voice analysis and get the phrase in text;
- Send the text of the trained model to the classification and get the result. To describe it with a diagram, the problem is as follows:
Now each phase in detail.
Phase 1: preparing the data for the speech classification model training
To get a trained model you can go two ways:
- Develop the neural network yourself and train the model;
- Take a ready-made model and ready-made neural network, train it on your own data set, use Python as a tool, for instance.
To simplify the process, we'll go the second way. Apple has an excellent set of tools for this, so starting with Xcode 13, the debugging process of the model became as simple as possible.
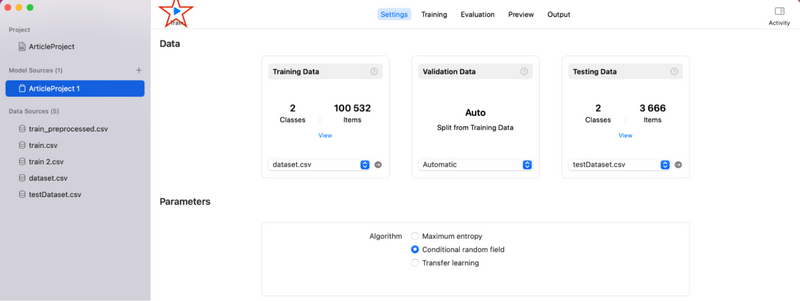
To begin with, launch the CreateML tool (it's already in XCode) and create a new project. Select TextClassification (Apple uses BERT) and create a project. You'll see a window for uploading the prepared data.
On the output, the tool accepts two datasets:
- the set for the model to complete its learning;
- the set to compare the results to.
All the data must be in json or csv. The dataset structure should follow the template:
For json:
[
   {
       "text": "The movie was fantastic!",
       "label": "positive"
   }, {
       "text": "Very boring. Fell asleep.",
       "label": "negative"
   }, {
       "text": "It was just OK.",
       "label": "neutral"
   } ...
]
For csv:
text,label
"The movie was fantastic!",positive
"Very boring. Fell asleep.",negative
"It was just OK.",neutral
The data is ready, now you can upload and start training the model:
How to tell everything is ready and works correctly?
To evaluate the results, there are reports for each learning project:

Precision - how well the model identifies the target (in our case the target is the phrase to characterize), with with no false-alarm.
Recall - how correctly the model identifies the target.
F1 score - an indicator that combines the accuracy and complexity of the algorithm. Here's how you calculate it:

The higher the Precision and Recall, the better. However, in reality, it is impossible to reach the maximum of both indicators at the same time.
All you have left to do is to export the received model, in *.mlmodel.
Phase 2: receiving the audio signal and sending it for speech recognition
On iOS it is the Speech framework translates voice into text. There's a trained model in it already. Since our main task is to translate speech to text in real time, the first thing to do is to get the samples of the AVAudioPCMBuffer audio signal and them to the recognizer.
class AudioRecordService {
   private var audioEngine: AVAudioEngine?
   func start() {
            do {
                audioEngine = try configureAudioEngine()
            } catch {
                audioRecordingEvents.onNext(.error(.startingAudioEngineError))
            }
    }
    private func configureAudioEngine() throws -> AVAudioEngine {
        let audioEngine = AVAudioEngine()
        let inputNode = audioEngine.inputNode
        let recordingFormat = inputNode.outputFormat(forBus: 0)
        inputNode.installTap(onBus: 0, bufferSize: 1024, format: recordingFormat) { [weak self] buffer, _ in
            self?.audioRecordingEvents.onNext(.audioBuffer(buffer))
        }
        audioEngine.prepare()
        try audioEngine.start()
        return audioEngine
    }
}
Set a zero-bus branch and the samples will arrive as soon as the audio frame number is 1024. By the way, a AVAudioNode object can potentially have several input and output buses.
Send the received buffer for speech recognition:
Create an enumeration for error processing
enum SpeechReconitionError {
    case nativeError(String)
    case creatingTaskError
}
Create an enumeration for recognition events
enum SpeechReconitionEvents {
    case phrase(result: String, isFinal: Bool)
    case error(SpeechReconitionError)
}
Create a SFSpeechRecognizer object
private var request: SFSpeechAudioBufferRecognitionRequest?
private var reconitionTask: SFSpeechRecognitionTask?
private let recognizer: SFSpeechRecognizer?
 init() {
        recognizer = SFSpeechRecognizer(locale: Locale.preferredLanguages[0])
    }
Configure recognizer and launch the recognition task
func configureRecognition() {
        request = SFSpeechAudioBufferRecognitionRequest()
        if #available(iOS 16.0, *) {
            request?.addsPunctuation = true
        }
       if let supports = recognizer?.supportsOnDeviceRecognition, supports {
            request?.requiresOnDeviceRecognition = true
        }
        request?.shouldReportPartialResults = true
        guard let request else {
            stopRecognition()
            events.onNext(.error(.creatingTaskError))
            return
        }
  reconitionTask = recognizer?.recognitionTask(with: request, resultHandler: recognitionTaskHandler(result:error:))
    }
The function to add audio buffers to the recognition queue
func transcribeFromBuffer(buffer: AVAudioPCMBuffer) {
        request?.append(buffer)
    }
Configure the results processor
private func recognitionTaskHandler(result: SFSpeechRecognitionResult?, error: Error?) {
        if let result = result {
            events.onNext(.phrase(result: result.bestTranscription.formattedString, isFinal: result.isFinal))
            if result.isFinal {
                eraseRecognition()
            }
        }

        if let error {
            events.onNext(.error(.nativeError(error.localizedDescription)))
            return
        }
    }

    private func eraseRecognition() {
        reconitionTask?.cancel()
        request = nil
        reconitionTask = nil
    }
The recognition process will start immediately after configureRecognition(). Then transfer the resulting audio buffers to transcribeFromBuffer(buffer: AVAudioPCMBuffer).
The recognition process takes about 0.5–1 seconds. Therefore the result comes asynchronously in the function ecognitionTaskHandler(result: SFSpeechRecognitionResult?, error: Error?). SFSpeechRecognitionResult and contains the results of recognition of the last audio buffer, as well as the results of all previous recognitions. That is, on the screen the user sees the last recognized sentence and everything that was recognized earlier.
Also, recognition doesn't always occur directly on the device. When offline recognition is not available, AVAudioPCMBuffer samples are sent to and processed on Apple servers. To verify and enforce the offline mode, use the following command:
if let supports = recognizer?.supportsOnDeviceRecognition, supports {
            request?.requiresOnDeviceRecognition = true
 }
Apple claims the on-device results are worse. But there are limits for using it online.

Phase 3: speech classification
Note: the main rule to using neural networks for speech classification is the more context there is, the better the accuracy.
First things first, import the ML model to the project as a regular file. Next, create an instance of the model class. The file name will be the class name.
init?() {
        do {
            let config = MLModelConfiguration()
            config.computeUnits = .all
            if #available(iOS 16, *) {
                config.computeUnits = .cpuAndNeuralEngine
            }
            mlModel = try ToxicTextClassificatorConditionalAlgoritm(configuration: MLModelConfiguration()).model
            if let mlModel {
                predicator = try NLModel(mlModel: mlModel)
            }
        } catch {
            print("Can not initilaize ToxicTextClassificatorConditionalAlgoritm")
            return nil
        }
    }
NLModel - is the object you'll further work with.
Once created, the model is ready to accept input text for classification.
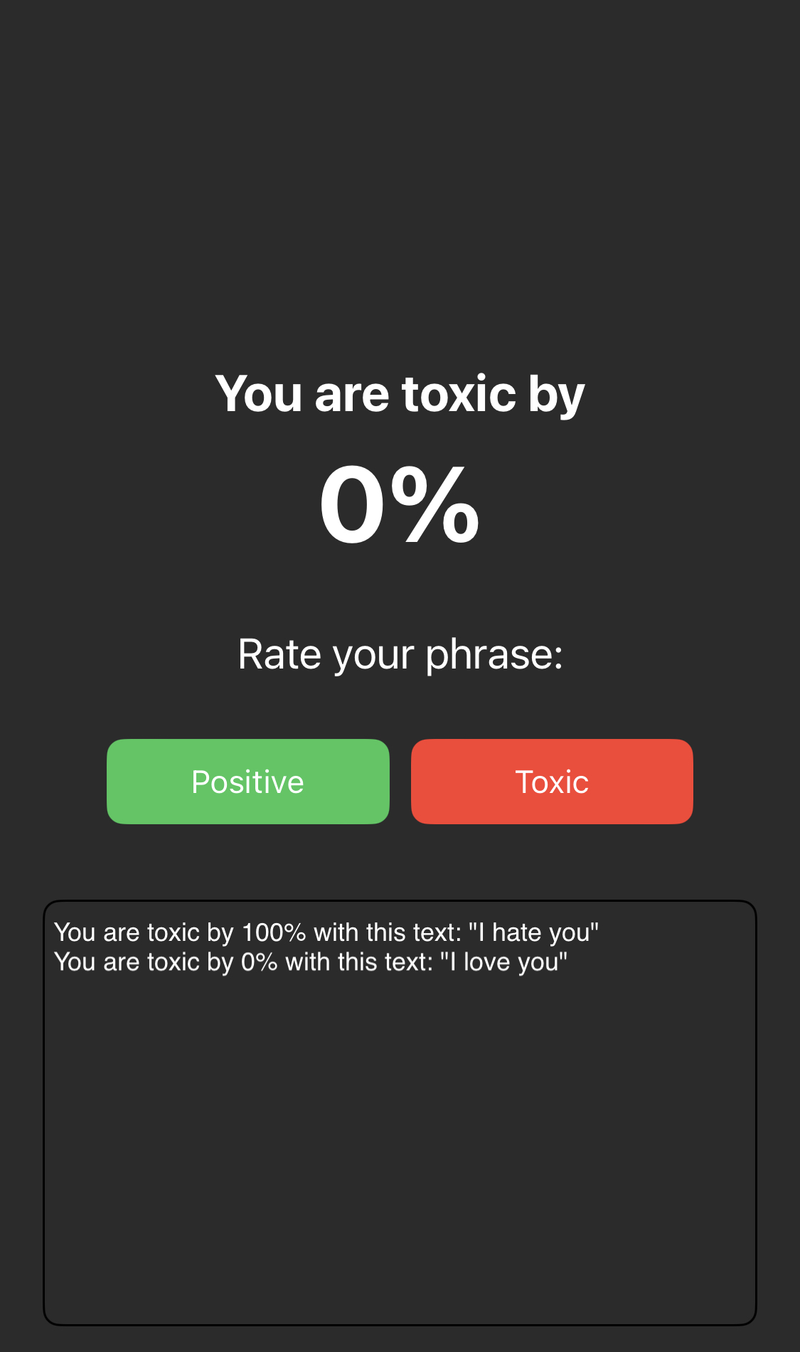
List the possible outcomes of the classification.
enum PredictResult: String {
    case toxic
    case positive
}
Now try to get the result!
func predictResult(phrase: String) -> PredictResult? {
        guard let predict = predicator?.predictedLabel(for: phrase),
              let result = PredictResult(rawValue: predict) else { return nil }
        return result
   }
We analyze the phrase in real time. This means that the pieces that obtained in the second phase immediately fall into the classification. Because of this, the accuracy of the classification is inevitably lost.
How to enhance the results accuracy?
а) If there is no punctuation, classify the text as it comes after the recognition and record the result. To do this, write a function that will accept the recognized text and flag that speech recognition is over.
Reminder: the phase will contain more words each time for SFSpeechRecognitionResult returns the recognition results of the last audio buffer recognition along the results of all previous recognitions.
func analyze(phrase: String, isFinalResult: Bool) {
        guard let predict = predictResult(phrase: phrase) else {
            if isFinalResult, let result = predictResult {
                event.onNext(.finalResult(result))
            }
            return
        }
        predictResult = predict
    }
b) If there's no punctuation* but you need to reduce the overhead for classification, you can only take the last N words from the sentence. However, this would greatly reduce the accuracy of the classification.
*To add automatic punctuation placement (currently only available in English):
if #available(iOS 16.0, *) {
            request?.addsPunctuation = true
  }
To improve accuracy and reduce computation overhead, you can use the algorithm to divide text into sentences in proportion. For example, if there are 3 sentences in the text, do 2:1 or 1:2. That is, analyze the first 2 sentences first, then 1 remaining or first 1, then 2.
Note: It's necessary to request access to the mic and the permission for speech recognition.
Alternative ways to get MLModel
- Tool set for Python CoreML tools, that allows converting models trained with other neural networks to mlmodel:
- CoreMl tools for TensorFlow
- CoreMl tools for PyTorch
- TensorFlow Lite for iOS. It allows working with models trained with TensorFlow.
You can use neural networks for a plethora of different solutions. See how we work with it when developing video surveillance systems.


Top comments (0)