cover image by yours truly 😉
✨ Hello! ✨
I am challenging myself to post about my projects and learning, so here is a project I am working on! Thank you for reading 💛
💻 The Project
I am currently working on coding a responsive portfolio website for a fictional photographer. I took a design I created from a previously completed Skillcrush class and decided to turn it into a functional website to practice my HTML, CSS, and flexbox skills.
❓ The Problem
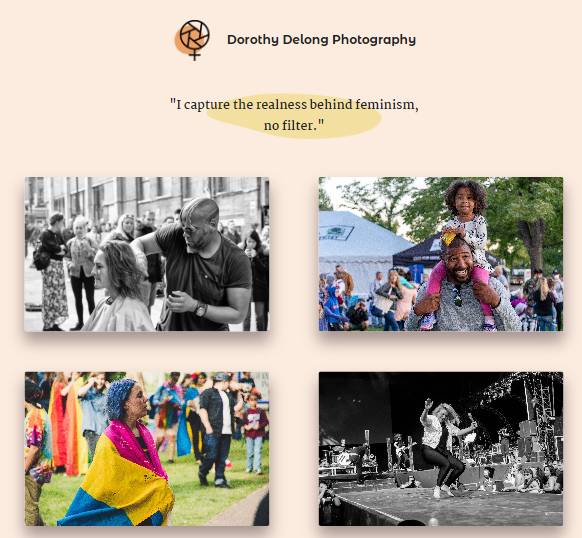
I have coded everything up, using media queries and flexbox to ensure responsiveness across screens, but the image layout for the tablet and desktop versions is... boring (refer to the image below).
⭐ The Goal
I want to better showcase the images for the portfolio website by applying CSS animations. In addition to learning more about CSS animation properties, I will also be creating a new topic branch in GitHub, which will allow me to practice branching and merging in the command line. This is a valuable skill when working with a team!
📝 The Process
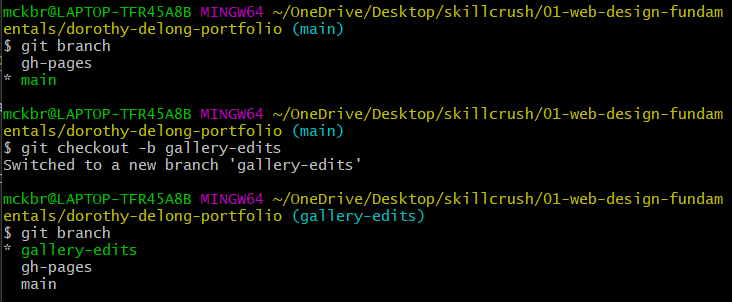
1. Creating a new branch
I didn't want to add errors to my existing code, so I created a new branch by typing git checkout -b gallery-edits in the command line.
2. Applying CSS animations
For the HTML, I first wrapped my <img> tags in a <figure> tag. I then wrapped it in a <div> tag with an id of "slider."
<div id="slider">
  <figure>
    <img src="" alt="">
    <img src="" alt="">
    <img src="" alt="">
    <img src="" alt="">
    <img src="" alt="">
  </figure>
</div>
In my CSS file, I applied styles to the #slider, #slider figure, and #slider figure img elements.
#slider {
  overflow: hidden;
}
#slider figure {
  position: relative;
  width: 500%;
  margin: 0;
  left: 0;
  animation: 20s slider infinite;
}
#slider figure img {
  width: 20%;
  float: left;
}
I used overflow: hidden to ensure that the images would stay within the #slider container.
Applying width: 500% makes the figure container take up 500% of the screen. Then, applying width: 20% to each img means we will now see only 20% of the entire figure container on the screen (or one image, as there are five images total).
🪄 Now it's animation time! I applied animation: 20s slider infinite to the figure container. This mean that the animation will last 20 seconds, we will name it "slider" (this will be referred to in the keyframes later), and it will never stop.
3. Using @keyframes
I'll admit, this part took me a little time to fully understand, but it is a pretty fun and versatile tool once you get it! Luckily, the w3newbie tutorial I was following made it very clear which percentages to use, so I just needed to do some extra research to understand WHY these percentages were used.
@keyframes slider {
  0% {
    left: 0;
  }
  20% {
    left: 0;
  }
  25% {
    left: -100%;
  }
  45% {
    left: -100%;
  }
  50% {
    left: -200%;
  }
  70% {
    left: -200%;
  }
  75% {
    left: -300%;
  }
  95% {
    left: -300%;
  }
  100% {
    left: -400%;
  }
}
@keyframes slider is now referencing back to the name we gave to the animation property earlier. Each percentage in the @keyframes at-rule indicates how the animated element, in this case, the group of images, should render at that SPECIFIC point in the animation sequence.
After playing around with it, I figured out that the 20%, 45%, 70%, and 95% properties create a delay so each image stays still a little longer. The 100% property is necessary in order to create a smooth transition back to the beginning of the animation. I also added another <div> for the titles of each image and applied the same CSS animation:
<div id="image-titles">
  <div class="titles">
    <h3><span class="title">Haircut</span>, NYC 2018</h3>
    <h3><span class="title">Father</span>, NYC 2017</h3>
    <h3><span class="title">Moment</span>, Houston 2016</h3>
    <h3><span class="title">Flag</span>, Washington DC 2017</h3>
    <h3><span class="title">Haircut</span>, NYC 2018</h3>
  </div>
</div>
4. Resolving conflicts and MERGING, bebe!!!
After adding (git add .) and committing (git commit -m "message") my final changes to the gallery-edits branch, I was finally ready to merge the gallery-edits branch with the main branch. Upon doing so in the command line, you can see that I received a merge conflict error:
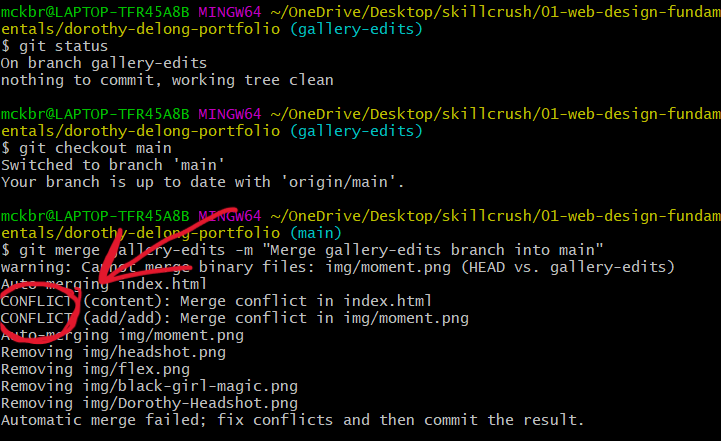
When I opened my code in VS Code, I saw conflict markers that Git placed around the conflicting code. The <<<<<<< HEAD marker indicates the branch I am currently on (the main branch), and the >>>>>>> gallery-edits marker indicates the conflicting commit coming from the topic branch.

I resolved the conflicts, then added and committed the changes once more. Then, I deleted the gallery-edits branch using git branch -d gallery-edits, as I no longer needed the branch. After that, using git push origin main, I pushed my changes to the main branch.
You can view the final website here!
💭 Final Thoughts
Honestly, I could have spent A LOT more time on this, even though I started coding the website three weeks ago (I have been doing other things too, I promise!). I am not satisfied with the desktop layout - I might change it later to make both the gallery and the about section side by side, so folks viewing it on a desktop can see it all without scrolling. But I really need to move on, so for now, that's all!
Thank you to anyone who has taken the time to read all of this! Hopefully, writing about my process like this will not only show my learning progress, but will allow me to improve upon my technical writing skills. Bye!
🖱️Resources I used
Past lessons from Skillcrush.
This VERY helpful tutorial from w3newbie.
This MDN Web Docs article on CSS animations and keyframes.


Oldest comments (6)
very good information, I am charles Michael Vaughn from states
Thank you for reading!
This is AWESOME! Thank you so much for posting you beginning steps with CSS animation! This is something I've been wanting to get into and been pretty intimidated by, but seeing you tackle this challenge gives me more confidence! That keyframes thing is p cool!
Thank you! I think there is a lot you can do with CSS animation that I previously thought you could only do with JavaScript, so I also want to practice more with it for sure.
Wow, your detailed explanation of working on the responsive portfolio website is really insightful! I'm impressed by how you're leveraging CSS animations and keyframes to enhance the image Fnb Code layout. It's great that you're documenting your process - not only does it demonstrate your learning journey, but it also improves your technical writing skills. The resources you've shared are super handy too. Keep up the fantastic work!
Thank you!!!