What is a WAF and Why You Need One
A Web Application Firewall (WAF) acts as a vital security layer for any server exposed to the internet. Without a WAF in place, your server is open to threats like SQL injection, code injection, and backdoor exploits. Even if these attack types don’t seem immediately relevant, hackers can exploit them to deploy mining scripts that overload your CPU and drain resources.
Why SafeLine Stands Out
Cost Efficiency
SafeLine comes in three flavors: a free Community Version, a Lite Version, and a Professional Edition. The Community Edition already includes everything you need for solid protection without any cost, making it a smart choice for developers and small projects.
Hassle-Free Deployment
As someone who frequently works with Docker, I love that SafeLine supports containerized deployment. It’s ready to roll right out of the box, saving you time and effort on setup.
Reliable Security
For personal or smaller websites, having a stable and secure environment is crucial. SafeLine provides a straightforward yet dependable defense system, so your web space stays safe without complicated configurations.
Introducing SafeLine
Built by Chaitin Technology after nearly a decade of development, SafeLine is a WAF powered by smart semantic analysis algorithms. Its traffic processing engine is based on Nginx, functioning as a reverse proxy that filters and cleans incoming requests before they ever hit your server.
This means malicious traffic is stopped cold at the gateway, keeping your backend servers protected from external attacks.
How to Deploy SafeLine
1. Installation
SafeLine offers several ways to install, with detailed guides available in their official documentation: SafeLine Installation Guide.
For a quick start, run:
bash -c "$(curl -fsSLk https://waf.chaitin.com/release/latest/setup.sh)
-- --en"
`
After installation, keep a note of your access credentials:
[SafeLine] Initial username: admin

[SafeLine] Initial password: **********

[SafeLine] Done
2. Accessing the Console
Open your browser and go to:
https://<your-server-ip>:9443
Log in with the credentials from installation to reach the dashboard.
3. Configuring Your Site
Originally, I had this setup:
Domain → Nginx listening on port 80 → Application
To add SafeLine, I changed it to:
Domain → SafeLine proxying → Nginx → Application
SafeLine can also run alongside Nginx if you prefer.
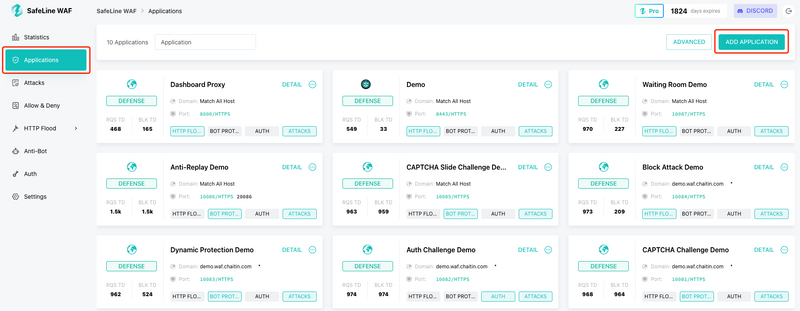
3.1 Adding a Web Service
Navigate to:
Applications → Add application
Fill in:
- Domain: Your domain or server IP
- Port: 80
- Upstream Server: Your server IP + application port
Submit the form. Visit your domain or IP to confirm traffic is passing through SafeLine.
3.2 Verifying Protection
If your requests load correctly, SafeLine is integrated. You can safely test by simulating attacks (avoid spamming to prevent IP blocking):
Test SQL Injection:
http://<your-domain>:<port>/?id=1%20AND%201=1Test XSS:
http://<your-domain>:<port>/?html=<script>alert(1)</script>
If you see the protective shield icon, your site is guarded.
3.3 Enabling Dynamic Protection
Protect your website’s source code by enabling dynamic protection:
Navigate to:
Applications → Bot Protect → Dynamic Protection
3.4 Additional Features
- Rate Limiting: Prevent excessive request floods or attack bursts by enabling rate limiting. Even if your site isn’t high-risk, it’s wise to stop continuous attack attempts.
- Force HTTPS: Enable HTTPS enforcement in proxy settings. If you lack an SSL certificate, SafeLine can help you get a free one valid for a year. Upload it via the certificate manager.
Change the listening port to 443, enable SSL, select your certificate, and submit. Your site now enjoys the added security of HTTPS.
For more in-depth details, check out the official docs: SafeLine Documentation
SafeLine combines ease, efficiency, and strong security—making it a perfect WAF choice for developers and small businesses alike.
Join the SafeLine Community
If you continue to experience issues, feel free to contact SafeLine support for further assistance.


Top comments (2)
Locksmith Selby delivers dependable security solutions for homes, businesses, and vehicles, combining expertise with quick response times. Their professional team handles lock repairs, key replacements, and emergency lockouts efficiently. How SafeLine became a developer favorite for web security mirrors the importance of reliable protection: just as developers trust SafeLine to safeguard applications, residents and business owners rely on Locksmith Selby to secure their property, ensuring peace of mind and lasting safety.
SafeLine is an excellent choice for developers seeking reliable, cost-effective web security. Its WAF blocks SQL injections, XSS, and other threats right at the gateway, with simple Docker-friendly deployment. The free Community Edition is feature-rich, making it ideal for small projects. For complex needs, you can always hire developers to optimize and customize your SafeLine setup.