SafeLine is a powerful open-source Web Application Firewall (WAF) that works as a reverse proxy, much like Nginx. It intercepts all incoming HTTP traffic, filters and inspects it for malicious patterns, and only forwards legitimate requests to your origin web server.
If you want to deploy SafeLine on a dedicated standalone server for maximum protection, here’s a complete step-by-step guide.
Why Use SafeLine on a Standalone Server?
- Dedicated protection: Your main web server stays isolated from direct traffic.
- Better performance: Offload filtering and inspection tasks to a separate machine.
- Extra security: Only SafeLine’s IP is allowed to talk to your origin server.
Configuration Overview
Environment Setup:
-
Web Server: IP Address A (
IPA), External Port80, Domain:example.com. (In this example: IPA = 192.168.117.6) -
SafeLine Server: IP Address B (
IPB).
Step 1 – Redirect All Web Traffic to SafeLine
Change your DNS settings so that your domain example.com resolves to IPB (SafeLine’s IP).
This ensures that all requests go through SafeLine before reaching your web server.
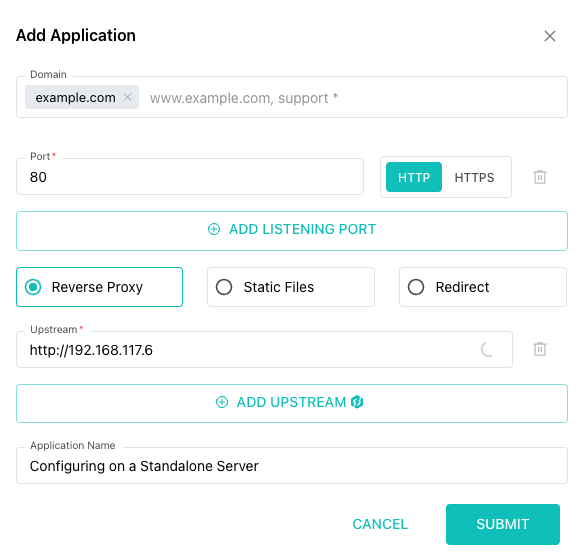
Step 2 – Configure SafeLine
In SafeLine’s admin panel, configure the backend target to point to IPA (your real server).
Make sure you match your server’s port and domain settings.
Step 3 – Restrict Direct Access to Your Web Server
To prevent attackers from bypassing SafeLine:
- Configure your firewall so that only SafeLine’s IP (
IPB) can connect to your origin server. - Block all other inbound requests to port 80 (or 443 if HTTPS).
Step 4 – Verify the Setup
After pointing example.com:80 to SafeLine, open the domain in your browser.
If your site loads correctly, SafeLine is successfully forwarding traffic.
Now, log in to SafeLine’s Dashboard → Data Statistics → Today's Requests.
If the request count increases as you refresh, it means SafeLine is actively filtering your traffic.
Step 5 – Enable Advanced Protection
SafeLine’s latest version allows per-site advanced settings:
- Custom Rules – Apply specific security rules for different sites.
- Human Verification – Require CAPTCHA challenges for suspicious requests.
- Additional Authentication – Restrict access to certain endpoints with extra login layers.
(Note: Custom rules are not affected by the toggle status.)
Final Thoughts
By running SafeLine on a dedicated standalone server, you create a secure buffer between the internet and your web application.
This setup not only filters malicious requests but also helps with traffic monitoring, DDoS mitigation, and long-term scalability.
Pro Tip: Always keep SafeLine updated to the latest release to benefit from the newest security features.
Join the SafeLine Community
If you continue to experience issues, feel free to contact SafeLine support for further assistance.


Top comments (3)
This SafeLine guide for a standalone WAF looks super robust! It's all about making sure your server has the right 'defensive personality,' if you will, to handle all sorts of traffic. It got me thinking about different profiles. Speaking of profiles, I sometimes like to personality test just to see what kind of 'profile' I get!
This page is a very useful guide to get started if you want to deploy a standalone SafeLine WAF. If you are new to security or just want to improve the security of your web server, the steps are quite reasonable and practical. royaledle
THANKS !