If you found this article helpful, you will most likely find my tweets useful too. So make sure you follow me on Twitter for more information about web development and content creation. This article was originally published on my Blog.
Node.js is a JavaScript runtime built on Chrome's V8 engine that helps to build scalable applications. As a web developer, you may find Node.js as omnipresent irrespective of client-side or server-side development. It provides and supports the NPM(Node Package Manager) environment that is widely used today.
On the other side, Ubuntu is an open-source operating system on Linux. It is available for the hobbyist, enterprises, desktops, and the cloud. In this article, we will learn to install, manage Node.js on the Ubuntu operating system so that you can quickly run a web application.
Let's clarify a few terminologies
Please feel free to skip this section if you are already aware or want to directly get to the installation commands.
It's essential to clarify a few terminologies around Node.js and Ubuntu. Usually, these terminologies are used as shortcuts and could be confused to a beginner.
-
Node.js Versioning: One of the things I was confused about initially was Node.js versioning. So thought of explaining it a bit here. On the download page, you will find two types of versions,
LTSandCurrent.
Image Courtesy: https://nodejs.org/en/download/
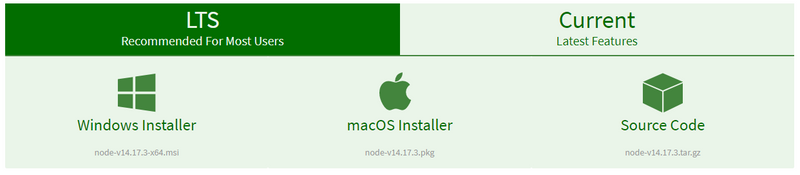
The term LTS stands for Long Term Support. The releases with this version focused on stability and security. If you plan to use Node.js in an enterprise app, you may opt for an LTS version.
The Current version is the Node.js release under active development for an upcoming major release. There is also a Nightly build available every 24-hours when there are changes.
-
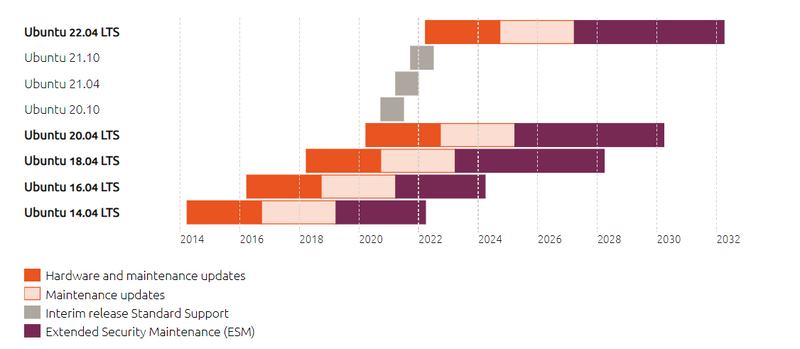
Ubuntu LTS Version: Similarly, Ubuntu also has the LTS(Long Term Support) versions like
Ubuntu 20.04 LTSthat releases every two years in April. Here also, the LTS releases are suitable for enterprises. You may find this image helpful in understanding Ubuntu's release cycles, versioning.
Image Courtesy: https://ubuntu.com/about/release-cycle
-
Ubuntu PPA:
PPAis the short form ofPersonal Package Archive. It allows you to upload Ubuntu source packages to be published as anaptrepository. Theaptis Advanced Package Tool that helps to install, remove apps on Ubuntu.
As you must have guessed now, Node.js PPA is available to use for installing it on the Ubuntu operating system. If you are inserted in knowing other PPAs, you can search them here.
Install Node.js on Ubuntu
We can install Node.js on Ubuntu in a couple of ways.
- Manually by adding the Node.js PPA and use the apt command-line tool to install.
- Using a tool called Node Version Manager(NVM).
We will see both. First, using the Node.js PPA.
curl is a command-line utility to transfer data over the network. Let us use curl to get the Node.js PP downloaded. But before that, let's install curl(assuming it is not installed already).
sudo apt-get install curl
The above command will install curl. Now use the following command to get the Node.js PPA and add it to the local system.
curl -sL https://deb.nodesource.com/setup_16.x | sudo -E bash -
The s and L switch of curl shows an error if the request fails and follows the HTTP redirects. Now, we can use the apt tool to install Node.js.
sudo apt-get install nodejs
That's all. You have installed Node.js successfully on ubuntu. To check its presence, you can query the version of it,
node -v
The Node.js comes with the npm utility. Please check its version as well to confirm the availability.
npm -v
Node Version Manager(NVM) on Ubuntu
You may want to keep your environment up-to-date with the latest Node.js releases. At times, some external libraries may work only with a specific version of Node.js. In these situations, you need to have multiple versions of Node.js installed on your operating system. It would help if you also could switch between these versions based on your needs. The Node Version Manager(NVM) tool helps you achieve that.
Install NVM on Ubuntu
It would be best if you used the install script to install or update NVM. We will use the curl utility to download and use the script. Run the following command from your Ubuntu terminal,
curl https://raw.githubusercontent.com/creationix/nvm/master/install.sh | bash
It will fetch the latest stable version of NVM for installation. If you are looking for a specific version of NVM, replace the master with the version number in the above URL. For example,
curl -o- https://raw.githubusercontent.com/nvm-sh/nvm/v0.38.0/install.sh | bash
The above command downloaded and installed the nvm tool. You can re-login to load nvm in your environment or use the following command to do the same,
source ~/.profile
If you faced any trouble, please check the additional notes from here. Now you have the nvm tool installed and ready to use.
Install Node.js using NVM
You can install Node.js using the NVM tool. To install the latest version of Node.js use,
nvm install node
To install a specific version of Node.js use,
nvm install 16.0.0
It will install the Node.js version 16.0.0.
List all the installed Node.js
You may install multiple versions of Node.js using NVM. If you want to list all the Node.js versions installed in the local operating system, please use the command,
nvm ls
If you want to list and view all the available node.js versions for installation, use this command.
nvm ls-remote
Use a specific Node.js version
To use a specific Node.js version, use this command,
nvm use 10.0.0
It will now use the Node.js version 10.0.0 in your environment till you change it again. If you want to get to the path of the executable, try this,
nvm which 4.6
Run a Node.js program with a specific version
It is handy when a Node.js program works on your environment but fails your customer's environment. You may want to quickly debug and check if a specific Node.js version is causing any issues. You can do it using NVM without any install/uninstall cycles.
Let's take a simple Node.js program, a simple server. Copy and paste the following code into a file and save it as server.js.
var http = require('http');

http.createServer(function (req, res) {
  res.writeHead(200, {'Content-Type': 'text/plain'});
  res.end('Hello Awesome People\n');
}).listen(3000, "127.0.0.1");

console.log('Server running at http://127.0.0.1:3000/');
Now you can run the above program using a specific Node.js version using this command,
nvm exec 10.10.1 server.js
Here we are executing the program using Node.js version 10.0.1.
Bonus: Install Yarn on Ubuntu
Yarn is a package manager that is fast, secured, and gained lots of popularity in the last few years. You may want to handle the package management of your project using yarn instead of npm. In that case, you need to install yarn separately.
You can install the yarn tool multiple ways on a Ubuntu OS. You can install it using PPA, script, or just by using the npm command. As we have installed npm already, let's use the same to install yarn globally.
Please use the command,
npm install -g yarn
It will install yarn globally on Ubuntu.
Uninstall Node.js
At times, you may have to uninstall Node.js as well. You can do it using these commands.
Remove Node.js
sudo apt-get remove nodejs
Remove npm
sudo apt-get remove npm
Finally,
sudo apt-get update
If you uninstall Node.js using nvm,
nvm uninstall 12.7.0
Please make sure the related folder is not left out under the .nvm directory. If so, please remove manually,
cd ~/.nvm/versions/node
sudo rm -rf v12.7.0/
In Summary
That's all for now, friends. In this article, we learned,
- A few basic terminologies around Node.js and Ubuntu
- How to install Node.js using PPA
- How to install Node Version Manager(NVM) and use it further to manage Node.js on Ubuntu.
- How to install the yarn package manager.
- Finally, how to uninstall Node.js completely.
Up next, we will learn how to host a Node.js application on ubuntu and make it secure using HTTPS. Please stay tuned. Are you looking for a video tutorial on the same topic? Please check it out 👇
I hope you enjoyed this article or found it helpful. Let's connect. Please find me on Twitter(@tapasadhikary), sharing thoughts, tips, and code practices. Please give a follow.
You may also like,


Oldest comments (0)