Today's post makes its return by covering the first 10 lessons of Bootstrap, a CSS framework developers can use to make mobile responsive sites and apps. This crash course in Bootstrap is a review of the lessons in the Responsive Design with Bootstrap section in the front-end developer certification at freeCodeCamp. During the last post, I showed you how to create buttons with Bootstrap classes and make mobile responsive images.
Most importantly I showed you how to add Bootstrap to your HTML file so you can begin adding Bootstrap classes to your code. This week the series is continuing with Bootstrap in the freeCodeCamp Bootstrap course. During this post, I'll cover the next nine lessons of the course.
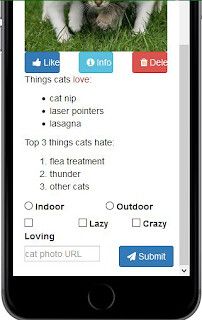
These lessons will wrap up the Cat Photo App project students build during the HTML & CSS course. During today's lessons, I will be showing you how to use Bootstrap to style elements on your site. You will be learning how to add icons to your site with Font Awesome, lining up elements, and how Bootstrap can transform a site's form.
11. Ditch custom CSS for Bootstrap.
Developers love using Bootstrap for customizing websites since these styles are often built into the framework, doing all the work for you and giving you less code to write. On the cat photo app, you can delete some of the custom CSS styles already added in the style tag. If I added Bootstrap classes to any tags with custom styles, only the Bootstrap styles would show.
Therefore, if I wanted to change the h2 headline from blue to red, I'd need to change the class to text-danger or use CSS to customize the color. The first item freeCodeCamp wants students to do is style the h2 headline and make the orange cat photo image responsive. You can do this with Bootstrap classes like text-primary and img-responsive.
I already showed you how to use the img-responsive class to make images fit the size of any screen. The text-primary tag is one of the tags that let Bootstrap change the color of the text. When the class is added to specific HTML tags, the font color will change. The text-primary class will change the font color to blue.
12. Use spans for inline elements.
freeCodeCamp wants to add some style to inline elements like the specific words or buttons on the Cat Photo App. These cases are examples of inline elements. You might remember seeing some span tags in previous projects featured on these blogs.
Span tags make it possible for developers to style small parts of the text inside another HTML element. You can review span tags with my previous post The Ultimate HTML & CSS Cheatsheet.
To complete this lesson, students need to style the word love using span tags. First, add your span tags in your code around the words you want to style. Make sure you use opening and closing tags.
Next, you add the Bootstrap class you want to use to change the color of the text. freeCodeCamp wants the word love in red so I'll use the text-danger class. Text-danger tells the computer to change the color to red.
13. Create a custom heading.
Let's start adding some style to the Cat Photo App's heading. freeCodeCamp wants the h2 headline on the same line as the orange cat photo. To get everything on the same line, developers put the elements they want together inside div tags.
I will put two div tags around my h2 headline and image. Inside the opening div tag, I will give the tag a class name "row". Row tells the computer these elements will be lined up in a row side by side.
Once this class is added, you will see your elements automatically line up next to each other in the sample project. Once your elements are in a row, it is time to give some spacing between the two elements. I can do this using the Bootstrap grid system.
First, I'm going to give each element its own separate set of div tags. Then I will add the Bootstrap classes. When using the grid system, developers need to use the format "col-xs-*" as the class name.
This will tell the computer how many columns wide the element is for what type of screen. I will use "col-xs-8" for the h2 headline and "col-xs-4" for the orange cat image. This will automatically adjust these elements on the freeCodeCamp project with just the right amount of space between the elements so it doesn't look cramped.
14. Add font awesome icons to buttons.
Now that the heading is looking better, it is time to give some attention to the buttons. freeCodeCamp uses this lesson to introduce Font Awesome, a library of icons developers can use for their projects. These icons are vector graphics stored as a .svg file.
During this course, freeCodeCamp tells students to add Font Awesome to their sites using the following link in the head tag:
<link rel="stylesheet" href="//maxcdn.bootstrapcdn.com/font-awesome/4.5.0/css/font-awesome.min.css"/>
This link will connect your project to the Font Awesome library, making you ready to use any of the icons for your project. freeCodeCamp already does this for you, but you can practice this in CodePen or your text editor if you are planning to add any icons to your site.
To add one of these icons to your site, you need to use the i tag. The i tag lets the computer know this element is an icon. Developers often used the i tag in the past to make text italics, but now it is mostly associated with creating icons.
During this lesson, you will use the i tag to create a thumbs-up icon on the Like button. First, wrap the word Like inside an opening and closing i tag. In the opening i tag, create a class named "fa fa-thumbs-up".
The fa is the Font Awesome prefix while the fa-thumbs-up is the name of the icon being used. Now check the button on your site. Now a small thumbs-up icon will appear inside your Like button.
15. Add Font Awesome Icons to all of our Buttons.
Now that you know how to add Font Awesome icons to your site, this lesson is having you repeat the same steps with the other two buttons. This time you are adding the classes fa fa-info-circle and fa fa-trash. The fa-info-circle will create a small circular info icon next to the Info button. The trash button will have a small trash can icon next to Delete.
16. Responsive style radio buttons.
Now that the Cat Photo buttons have a little style, we are going to add some Bootstrap classes to the form. We can use the col-xs-* format to determine how far apart the radio buttons can be spread out on the page. The class we set keeps this width no matter what screen resolution we have.
First, the radio buttons need to be in a row. Nest the radio button tags in between div tags with the class "row". Now give each radio button a div class named "col-xs-6".
This will tell the computer each radio button will be six columns wide. Your code should look like this when it is done:
<div class="row">
  <div class="col-xs-6">
    <label><input type="radio" name="indoor-outdoor">Indoor</label>
  </div>

  <div class="col-x-6">
    <label><input type="radio" name="indoor-outdoor">Outdoor</label>
  </div>
</div>
Once you add the code, space will appear between the two radio buttons on the app.
17. Responsively Style Checkboxes.
Now that you know how to spread form elements on the page with the grid system, you will do the same thing with the other elements on the page. freeCodeCamp wants each check box to be only four columns wide. This time, wrap each check box inside a div tag with the class "col-xs-4".
Each div tag will evenly space out the checkboxes. Don't forget to put all the checkboxes in a div class named "row". This will keep all the checkboxes together instead of stacked on each other.
18. Style Text Inputs as Form Controls.
The next item freeCodeCamp wants to style is the input text field and the button. This lesson wants students to add a paper airplane to the submit button and extend the field bar across the screen. First, let's adjust the input field.
Inside the input tag above the submit button tag, add the class "form-control". Form control will increase the input field length so it extends across the screen, making it easier to read the cat photo placeholder inside. The last thing we need to do in this lesson is add the paper airplane to the submit button.
Luckily there is an icon in the Font Awesome library you can use. Inside the submit button tag, wrap the word Submit in between two i tags. In the opening tag, add the class "fa fa-paper-plane".
This will create the airplane icon right next to the Submit button. The last thing we need to style is the input field at the bottom of the form. To style the form, you need to use the class form-control.
Add the class form-control to your input tag and look at the input bar. Originally the bar was smaller, but the form-control class made the input bar fit the size of the screen. Now you just need to change the submit button's color. Inside the submit button's button tag, add the class "btn btn-primary" and the button will change to blue.
19. Line up Form Elements Responsively with Bootstrap.
The last thing you need to do for the Cat Photo App right now is line up the input bar and submit button with the rest of the form. We are going to use the grid system to do this. First, put the input tag for the cat photo URL and the submit button's button tag inside a div tag with the class name row.
You'll automatically see the elements move side by side on the app. Now wrap each element inside a pair of div tags. Give the div tag for the cat photo URL input a class of col-xs-7. The submit button's div tag will have a class col-xs-5 so there's just enough space between the input bar and the button.
Conclusion
That's a wrap for today's lessons! During this post, you learned how to use Bootstrap to add more style to your website instead of creating custom styles for elements. Today's post also wraps up the Cat Photo App sample project in freeCodeCamp.
Make sure you check out the pen below to play around with the pen's size to see how it would look in different browsers. Tomorrow, I'll be continuing to review Bootstrap with the next 10 lessons in freeCodeCamp's course. The next Bootstrap project is a jQuery playground that will allow you to play around with new concepts as well as concepts already featured in this series.
This post was originally published on January 24, 2018 on the blog The Original BritishPandaChick. I made minor changes to the original post to work here on CodeNewbie.


Top comments (0)