As part of my journey into Kubernetes, I decided to get hands-on by deploying SafeLine WAF, a free and open-source Web Application Firewall. This article walks through how I deployed SafeLine on a Minikube environment, along with the configuration adjustments needed to get it running smoothly.
Environment Overview
- OS: Ubuntu 22.04
- Specs: 2 CPU, 8 GB RAM
- Disk: 40 GB
- Platform: Minikube v1.31.1
Step 1: Prepare Configuration Files
SafeLine WAF provides Docker Compose files, which I converted to Kubernetes YAML using kompose. The configuration is split into two parts:
- WAF runtime modules (Tengine, management, etc.)
- Optional PostgreSQL and Redis databases (for testing only)
Download and extract both:
tar -xzvf safeline-ce-k8s-configs.tar.gz
tar -xzvf safeline-ce-k8s-db.tar.gz
Step 2: Load Docker Images into Minikube
You need to import the required SafeLine images into your local Minikube registry:
minikube image load chaitin/safeline-tengine \
                    chaitin/safeline-mgt-api \
                    chaitin/safeline-mario \
                    chaitin/safeline-detector
You can verify the images were loaded using:
minikube image ls
Step 3: Update Database Configuration
If you're using an external database, modify the database connection strings:
1. management-deployment.yaml
Replace the placeholder safeline-ce:${POSTGRES_PASSWORD} with your actual PostgreSQL username and password. Also replace the domain (@safeline-postgres) with the correct internal service name.
2. mario-deployment.yaml
Update both the PostgreSQL and Redis credentials in the same manner.
If you're testing locally, use the bundled DB config and auto-generate passwords:
echo "POSTGRES_PASSWORD=$(LC_ALL=C tr -dc A-Za-z0-9 </dev/urandom | head -c 32)" >> .env
echo "REDIS_PASSWORD=$(LC_ALL=C tr -dc A-Za-z0-9 </dev/urandom | head -c 32)" >> .env
cat .env
Then, edit postgres-deployment.yaml and redis-deployment.yaml to use those passwords.
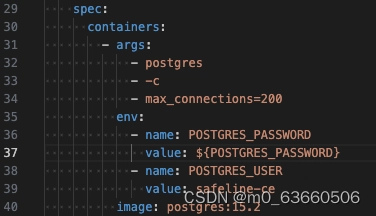
postgres-deployment:
redis-deployment:
Step 4: Deploy SafeLine
Ensure your database pods are up first, then deploy the rest:
cd safeline-ce-k8s-configs
bash ./start.sh
Check if pods are running:
kubectl get all
Step 5: Test the Deployment
To simulate a backend, apply the provided test server:
kubectl apply -f test-server.yaml
It exposes port 30007 to the host. To access the SafeLine dashboard:
Option 1: NodePort Access
Edit the management-deployment.yaml to check the nodePort setting.
Then:
kubectl get node -o wide
Access via http://<node-ip>:30018
Option 2: Port Forwarding (Local Access)
kubectl port-forward service/safeline-management 9440:9443
Then open your browser:
http://localhost:9440
You should now see the SafeLine admin panel where you can configure protection rules and upstream services.
Final Notes
Everything deployed successfully, but I did encounter one issue: Tengine wasn’t properly forwarding requests to the detector, so attack signatures were not being logged. This seems to stem from a misconfiguration in the internal Nginx routing and may require deeper tuning.
Overall, this was a great hands-on exercise in deploying a real-world WAF on Kubernetes. SafeLine's modular design and clear architecture make it a good candidate for experimentation in modern cloud-native setups.
Let me know if you’ve deployed SafeLine on K8s or have ideas on solving the Tengine-to-detector issue!


Top comments (1)
hi Sharon please check my new post here and must review how it looks, thanks.
Some comments may only be visible to logged-in visitors. Sign in to view all comments.